How To Mount Flexible Solar Panels To RV Roof?
How To Mount Flexible Solar Panels To RV Roof?
Mounting flexible solar panels to an RV roof requires proper surface preparation, strong bonding materials, safe wiring, and careful positioning. A correct installation prevents panel damage, water leaks, and power loss during long-term travel.
At Bright Solar, we have worked with flexible solar applications for RVs, campers, marine systems, and portable energy solutions. One detail we repeatedly see in real installations is that the mounting method matters as much as the solar panel itself.
Many RV owners choose flexible solar panels because they are lightweight and can follow curved roof surfaces. However, installation mistakes such as poor adhesion, trapped air gaps, or incorrect cable routing can reduce performance over time.
This guide explains how to mount flexible solar panels to RV roof based on practical installation experience and professional solar application knowledge.
Tools And Materials Needed For RV Flexible Solar Panel Installation
Essential Equipment Before Mounting
Before installing flexible solar panels on an RV roof, prepare all necessary materials.
Recommended tools include:
| Tool / Material | Purpose |
|---|---|
| Flexible solar panel | Energy generation |
| Cleaning solution | Remove dirt and oil |
| Microfiber cloth | Prepare mounting surface |
| Solar adhesive or VHB tape | Secure panel |
| Sealant | Protect cable entry points |
| Cable clips | Manage wiring |
| Multimeter | Check electrical output |
A clean installation environment is important.
RV roofs often collect:
- Dust
- Road debris
- Oil residue
- Tree sap
- Old adhesive materials
Even a thin contamination layer can reduce bonding strength.
During Bright Solar project evaluations, we usually recommend spending more time preparing the surface rather than rushing the installation. A strong connection starts with proper preparation.
Step 1: Inspect The RV Roof Before Installation
Check Roof Material And Available Space
The first step is evaluating the RV roof condition.
Common RV roof materials include:
- Fiberglass
- Aluminum
- EPDM rubber
- TPO membrane
Different surfaces require different preparation methods.
Before mounting, check:
Roof Condition
Look for:
- Cracks
- Loose coatings
- Water damage
- Uneven surfaces
Installation Area
Measure:
- Available roof space
- Panel dimensions
- Cable routing distance
- Shadow areas
Solar panels should be installed where they receive maximum sunlight exposure.
Avoid placing panels near:
- Air conditioners
- Roof vents
- Antennas
- Roof racks
Shading from these components can reduce energy production.
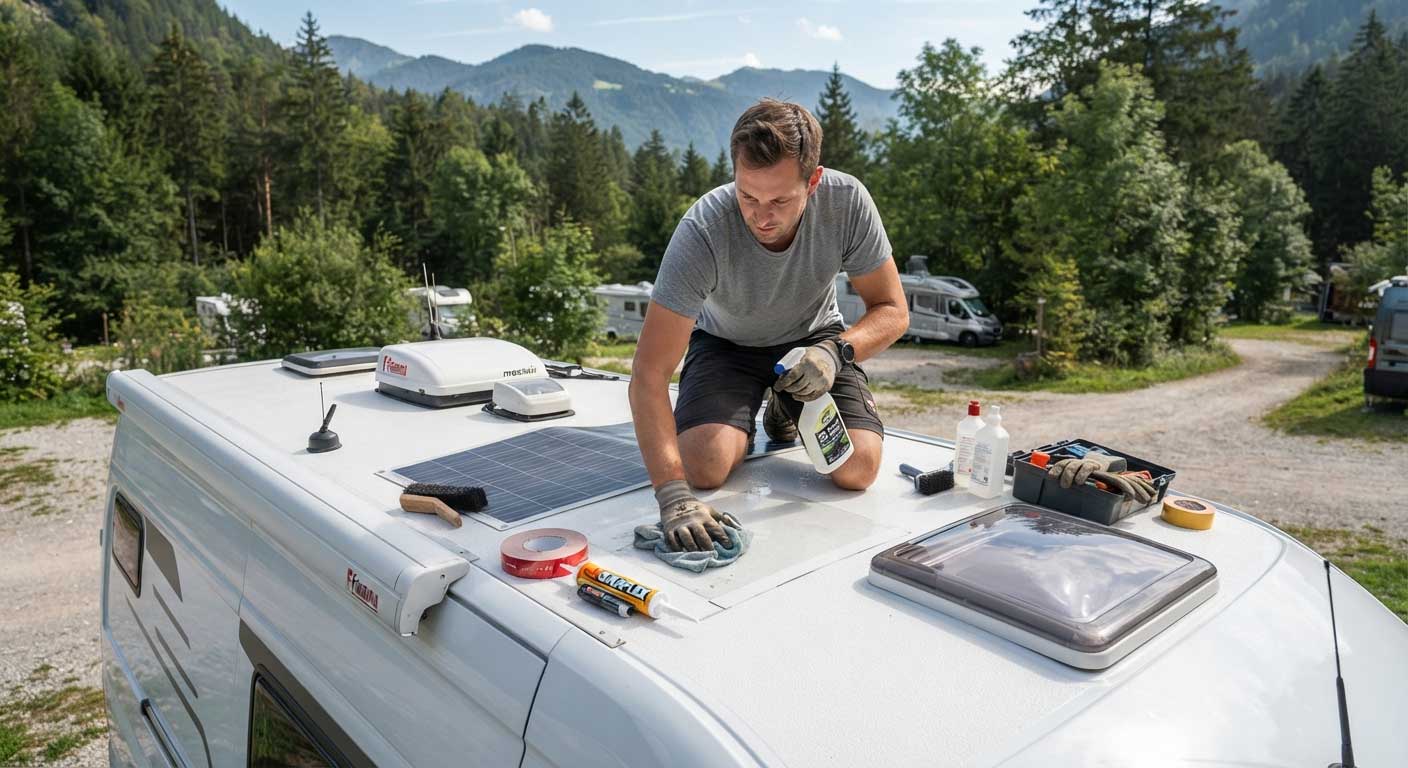
Step 2: Clean The RV Roof Surface
Surface Preparation Before Installing Flexible Solar Panels
A flexible solar panel relies heavily on adhesive bonding.
The roof surface should be:
- Clean
- Dry
- Smooth
- Free from grease
Recommended cleaning process:
- Remove loose dirt and dust.
- Wash the area with suitable cleaner.
- Dry completely.
- Wipe the mounting area before installation.
Do not install panels immediately after rain or washing.
Moisture trapped under the panel can affect adhesion and may create long-term problems.
For RV applications, this step is often overlooked because owners want to finish the installation quickly.
However, the roof preparation determines how well the solar panel performs after months of vibration, temperature changes, and outdoor exposure.
Step 3: Position Flexible Solar Panels Before Fixing
Test The Layout First
Before applying adhesive, place the flexible solar panels on the RV roof temporarily.
Check:
- Panel alignment
- Cable direction
- Roof curves
- Distance between panels
This step prevents repositioning problems after bonding.
Flexible solar panels are designed for installation situations where rigid glass panels are inconvenient.
Common advantages include:
- Lightweight structure
- Lower roof load
- Easier curved surface installation
- Better portability
According to the National Renewable Energy Laboratory (NREL), photovoltaic system performance depends on factors including module orientation, shading, and installation conditions.
Source:
https://www.nrel.gov/solar/
A well-positioned solar panel can improve overall energy harvesting compared with a poorly located installation.
Step 4: Choose The Correct Mounting Method
Adhesive Mounting For Flexible Solar Panels
Most RV flexible solar panels are installed using adhesive methods rather than heavy mounting brackets.
Common options include:
| Mounting Method | Suitable For |
|---|---|
| Industrial adhesive tape | Lightweight flexible panels |
| Solar adhesive | Permanent installations |
| Mechanical brackets | Special RV applications |
The correct choice depends on:
- Panel weight
- Roof material
- Travel conditions
- Manufacturer recommendations
For many RV owners, adhesive installation provides a cleaner appearance and avoids drilling additional holes into the roof.
However, the adhesive must be compatible with outdoor temperatures, UV exposure, and vibration.
Step 5: Apply Adhesive And Mount Flexible Solar Panels
How To Secure Flexible Solar Panels On RV Roof
After confirming the panel position, begin the final mounting process.
The installation steps are:
- Apply adhesive evenly to the back surface if required.
- Carefully place the panel onto the marked roof area.
- Press from the center toward the edges.
- Remove trapped air pockets.
- Allow sufficient curing time before driving.
Do not immediately expose newly installed panels to heavy vibration or extreme weather.
During RV solar projects, we often notice that rushed installations create problems later. Small air gaps under flexible panels may collect moisture, while uneven bonding can create lifting points when the RV travels at highway speeds.
A careful installation takes more time initially but improves reliability during long-distance travel.
Step 6: Connect And Route RV Solar Wiring
Wiring Flexible Solar Panels Safely
After the panel is fixed, the electrical connection needs careful planning.
A typical RV solar wiring system includes:
| Component | Function |
|---|---|
| Solar panel | Generates DC electricity |
| Charge controller | Regulates battery charging |
| Battery bank | Stores energy |
| Inverter | Converts power for AC devices |
Cable routing is one of the most important parts of the installation.
Avoid:
- Loose cables
- Sharp roof edges
- Areas with standing water
- Excess cable exposed to sunlight
Recommended practices:
- Use UV-resistant solar cables.
- Secure wires with clips.
- Protect connectors from moisture.
- Leave enough cable length for maintenance.
For larger RV solar systems, professional electrical design is recommended to ensure correct voltage and current matching.
Step 7: Waterproof Cable Entry Points
Prevent RV Roof Water Leaks
The solar panel itself is not usually the biggest waterproofing concern.
The cable entry point is often the area requiring the most attention.
Common waterproofing methods include:
- Solar cable entry glands
- Outdoor-rated sealant
- Protective covers
The installation area should be:
- Clean
- Dry
- Properly sealed
A small gap around wiring can allow water penetration during rain or washing.
From our experience at Bright Solar, waterproof details often determine whether an RV solar installation remains trouble-free after several seasons of outdoor use.
Common Mistakes When Mounting Flexible Solar Panels To RV Roof
Installation Problems To Avoid
Many RV owners can install flexible solar panels themselves, but several mistakes can reduce performance.
1. Installing On A Dirty Roof
A dirty surface prevents strong adhesion.
Problem:
- Panel edges may lift
- Adhesive may fail
- Moisture may enter underneath
Solution:
Always clean and dry the roof before installation.
2. Ignoring Roof Temperature
Extreme temperatures affect adhesives.
Installing during very cold or very hot conditions may reduce bonding performance.
Better practice:
- Install in moderate weather.
- Follow adhesive manufacturer recommendations.
3. Covering Panels With Roof Equipment Shadows
Even partial shading can affect solar output.
Avoid installing panels too close to:
- Vent covers
- Satellite dishes
- Roof accessories
4. Using Incorrect Adhesive
Not all tapes or sealants are designed for outdoor solar applications.
Choose products designed for:
- UV exposure
- Temperature changes
- Outdoor vibration
How Long Do Flexible Solar Panels Last On RV Roof?
Flexible Solar Panel Durability
The lifespan of flexible solar panels depends on:
- Product quality
- Installation method
- Weather exposure
- Maintenance
High-quality solar panels are commonly designed for long-term outdoor operation.
The International Energy Agency (IEA) notes that photovoltaic technology continues improving in durability, reliability, and lifetime performance.
Source:
https://www.iea.org/topics/solar-pv
For RV owners, proper installation is especially important because panels experience:
- Road vibration
- Wind pressure
- Temperature cycling
- Outdoor exposure
A well-installed flexible solar panel system can provide reliable energy during many years of travel.
Bright Solar Experience: Flexible Solar Panels For RV Applications
Why Installation Details Matter
At Bright Solar, we have worked with flexible solar solutions where traditional rigid panels are not practical.
RV owners usually choose flexible panels because they need:
- Lightweight construction
- Space efficiency
- Easier installation
- Better surface adaptability
However, the installation environment is demanding.
An RV roof is constantly moving.
It experiences:
- Highway vibration
- Rain exposure
- Sunlight intensity
- Temperature changes
This is why we focus not only on solar panel output but also on:
- Material selection
- Waterproof design
- Installation compatibility
- Long-term reliability
A successful RV solar system combines the right product with the right mounting method.
FAQ About How To Mount Flexible Solar Panels To RV Roof?
Can I glue flexible solar panels directly to an RV roof?
Yes, many flexible solar panels can be installed directly using suitable outdoor solar adhesive or mounting tape. The roof surface must be properly cleaned and prepared first.
Do flexible solar panels damage RV roofs?
When installed correctly, flexible solar panels should not damage RV roofs. Proper adhesive selection and waterproof cable installation are important.
Should I drill holes to install flexible solar panels?
Many RV owners prefer adhesive mounting because it avoids drilling holes. However, the best method depends on the panel design and RV roof structure.
What adhesive is best for flexible solar panels on RV roofs?
Outdoor-rated solar adhesive or high-strength mounting tape designed for weather exposure is commonly used. Always check compatibility with the RV roof material.
Can flexible solar panels handle RV vibration?
Quality flexible solar panels are designed for mobile applications, but correct installation is necessary to prevent lifting, cable damage, or connection problems.
How many flexible solar panels does an RV need?
The number depends on electricity requirements, available roof space, battery capacity, and daily energy consumption.
How to attach flexible solar panel to RV roof?
To attach a flexible solar panel to an RV roof, clean the roof thoroughly, position the panel with airflow clearance, secure it using industrial adhesive or VHB tape, seal cable entry points with waterproof sealant, and connect the panel to a charge controller before testing system output.Learn more about “How to attach flexible solar panel to RV roof“
How to Mount Flexible Solar Panel?
Flexible solar panels are usually mounted using industrial adhesive, VHB tape, screws with spacers, or hybrid mounting systems. The safest installation keeps airflow under the panel, prevents water buildup, and avoids over-bending the panel surface. Done correctly, a flexible solar panel can stay securely mounted for 5–10 years on RVs, vans, boats, and curved roofs.Learn more about “How to Mount Flexible Solar Panel“
Conclusion: How To Mount Flexible Solar Panels To RV Roof?
How to mount flexible solar panels to RV roof requires more than attaching a panel to the surface. Proper preparation, adhesive selection, wiring protection, and waterproofing determine long-term performance.
A reliable RV solar installation should include:
- Clean mounting surface
- Correct adhesive method
- Secure cable routing
- Weather protection
- Proper electrical connection
From Bright Solar’s practical experience, flexible solar panels are an excellent solution for RV owners who need lightweight and adaptable renewable energy.
The best installation is not the fastest one.
It is the installation that continues working after thousands of miles on the road.
Related recommendations
-

How Do You Clean Solar Panels on Roof?
202Learn how do you clean solar panels on roof safely with real maintenance experience, cleaning methods, performance data, and expert advice from Bright Solar.
View details -
What Is the Price of Solar Panels?
205What is the price of solar panels? Learn real solar panel costs, pricing factors, system expenses, and expert buying insights from Bright Solar.
View details -
How Much Is Solar Panels?
183Learn how much is solar panels in 2026. Compare panel prices, installation costs, flexible solar panel costs, and real-world solar expenses with Bright Solar.
View details -
How Much Does It Cost for Solar Panels?
226How much does it cost for solar panels? Explore real solar panel prices, installation factors, incentives, and expert cost insights from Bright Solar.
View details