Solar Panels on RV Roof: Complete Guide for Off-Grid RV Power
Solar panels on rv roof allow RV owners to generate clean electricity for batteries, appliances, and daily travel needs without relying on campground hookups. A properly designed RV solar system combines panel capacity, roof space, battery storage, and installation planning to deliver reliable off-grid power.
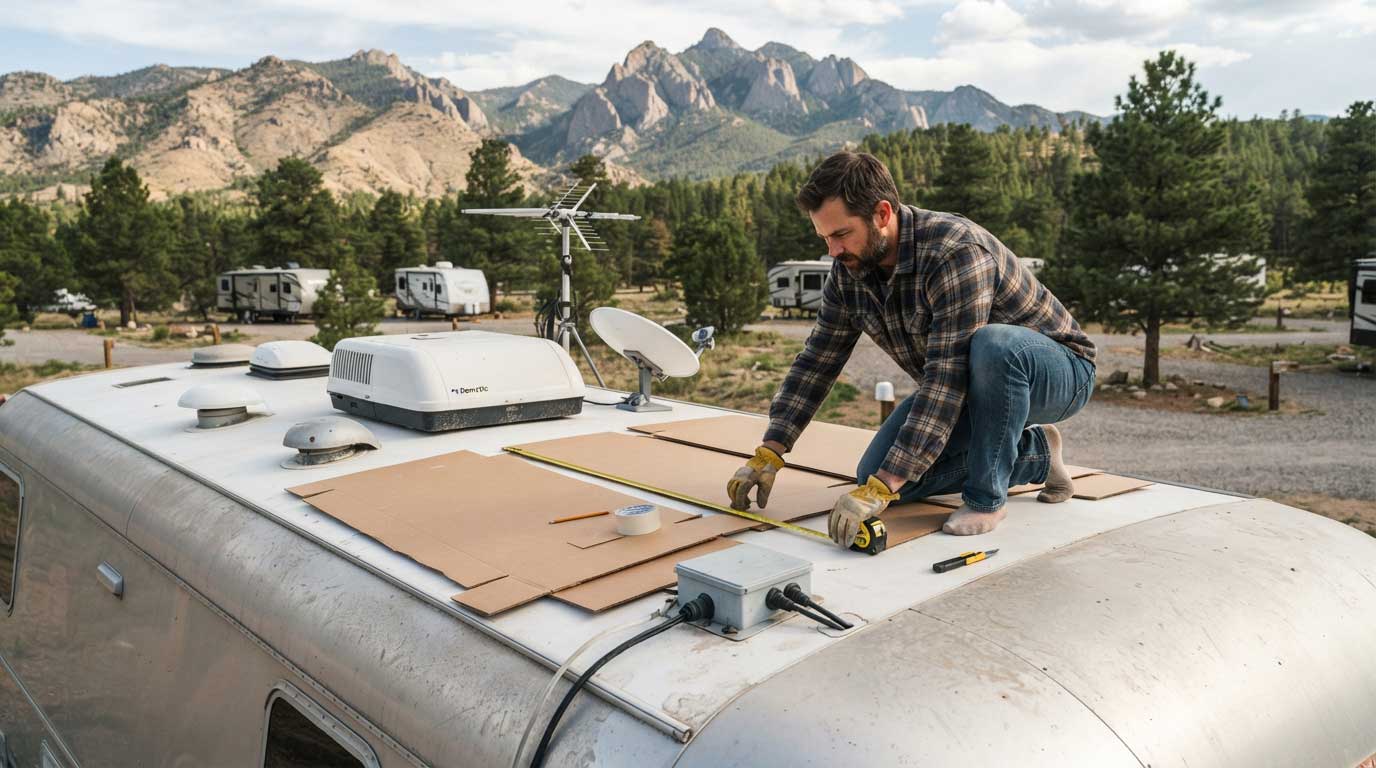
For many RV owners, installing solar panels is not simply about adding more watts to the roof. The real challenge appears when standing on the roof with a tape measure in hand and realizing that the available space is already occupied by an air conditioner, vents, antennas, skylights, and cable openings.
At Bright Solar, we approach RV solar design from the practical side: first understand the energy demand, then evaluate the roof layout, and finally select the right solar panel configuration. A high-wattage panel that does not fit properly or creates shading problems is not a better solution.
The roof is the foundation of the entire system.
How Solar Panels on RV Roof Work
An RV rooftop solar system converts sunlight into electricity and stores that energy inside a battery bank for later use. During the day, solar panels produce DC electricity, a charge controller regulates the charging process, and the battery stores energy for nighttime or low-sun conditions.
A complete RV solar system usually includes:
| Component | Function |
|---|---|
| Solar panels | Convert sunlight into DC electricity |
| Solar charge controller | Controls charging voltage and current |
| Battery bank | Stores electricity for later use |
| Inverter | Converts DC power into AC power |
| Wiring and protection devices | Transfers power safely |
The solar panel is only one part of the system.
A common mistake is choosing panels first and trying to design the rest afterward. In real RV projects, the battery capacity and daily energy consumption usually determine how much solar capacity is actually needed.
For example, an RV refrigerator may operate differently from a laptop charger. A refrigerator cycles throughout the day, while a laptop may only run for several hours. The energy calculation must consider actual usage time.
The basic formula is:
Daily Energy Consumption (Wh) = Device Power (W) × Operating Time (Hours)
Example:
| Device | Power | Daily Use | Energy |
|---|---|---|---|
| LED lights | 20W | 5 hours | 100Wh |
| Laptop | 60W | 4 hours | 240Wh |
| Phone charging | 10W | 3 hours | 30Wh |
| RV refrigerator electronics | 50W | 10 hours | 500Wh |
| Vent fan | 40W | 5 hours | 200Wh |
Total estimated demand:
Approximately 1,070Wh/day
A solar system should be designed to replace this energy while considering sunlight conditions, temperature, shading, and system losses.
The U.S. Department of Energy explains that photovoltaic production changes according to factors including sunlight availability, system orientation, location, weather, and equipment performance.
This is why RV solar design cannot rely only on the number printed on a panel label.
Why Install Solar Panels on RV Roof?
The main advantage of rooftop solar is energy independence.
Traditional RV travel often depends on:
- Campground electrical hookups
- Gas generators
- Frequent battery charging
- Limited camping locations
Solar panels on an RV roof provide another option: producing electricity wherever sunlight is available.
This is especially valuable for:
- Boondocking
- National forest camping
- Long-distance road trips
- Remote work travel
- Van life
- Off-grid RV living
A generator produces power when fuel is available. Solar produces power silently whenever sunlight reaches the panels.
That difference becomes noticeable after several days away from civilization.
A traveler parked near a desert trailhead may not want to start a generator at sunrise just to charge phones and run a refrigerator. A properly sized solar system quietly collects energy while everyone is outside hiking.
Choosing the Right Solar Panel Size for RV Roof
There is no universal RV solar size.
The correct system depends on:
- RV roof dimensions
- Battery capacity
- Daily electricity usage
- Travel frequency
- Climate conditions
- Available sunlight
- Appliance requirements
Common RV solar configurations include:
| RV Usage | Recommended Solar Capacity |
|---|---|
| Weekend camping | 100W–200W |
| Small camper electronics | 200W–400W |
| Regular off-grid RV travel | 400W–800W |
| Full-time RV living | 800W+ |
These numbers are planning ranges, not fixed rules.
A small camper with LED lights and phone charging may operate comfortably with 200W.
A larger motorhome running a refrigerator, inverter, laptop, internet equipment, and multiple devices may require much more.
Bright Solar recommends evaluating the entire electrical system instead of selecting panels based only on roof size. A large roof does not automatically mean a large solar requirement.
Planning the RV Roof Before Installing Solar Panels
The first step of a successful RV solar installation happens before drilling, mounting, or wiring.
It happens with a roof inspection.
An RV roof is not an empty rectangle.
Typical obstacles include:
- Air conditioners
- Roof vents
- Skylights
- Satellite antennas
- Plumbing vents
- Roof racks
- Existing wiring
- Maintenance access areas
A panel that physically fits may still perform poorly if it spends several hours under shade from an air conditioner or antenna.
During Bright Solar design reviews, one of the most common issues is not insufficient roof space. It is inefficient roof usage.
A slightly smaller panel layout can sometimes produce more usable energy than forcing larger panels into a poor arrangement.
Step 1: Measure Available Roof Area
Before selecting solar panels, measure:
- Roof length
- Roof width
- Flat installation areas
- Curved sections
- Existing equipment locations
- Cable entry possibilities
Create a simple roof drawing.
Mark every object that can block sunlight.
A practical method is using cardboard templates with the same dimensions as the solar panels. Place them on the roof before installation.
This reveals problems early:
- Panel overlap with vents
- Difficult cable routing
- Maintenance access problems
- Future repair limitations
This small preparation step can prevent expensive changes later.
Step 2: Consider Solar Panel Type
RV owners usually choose between rigid and flexible solar panels.
Rigid Solar Panels
Advantages:
- Higher mechanical strength
- Better airflow underneath
- Long-term durability
- Easier maintenance access
Disadvantages:
- Heavier
- Require mounting brackets
- Increase roof height
Rigid panels are commonly used on larger RVs where roof space and weight capacity are less restrictive.
Flexible Solar Panels
Flexible solar panels are increasingly used for mobile applications because they provide:
- Lower weight
- Slim profile
- Easier installation on certain surfaces
- Cleaner appearance
They can be useful for:
- Camper vans
- Lightweight trailers
- Curved roof sections
- Marine applications
However, flexible does not mean the electrical requirements change.
A flexible panel still has:
- Rated power
- Voc
- Vmp
- Isc
- Imp
- Operating temperature range
The charge controller and battery system must still match the panel specifications.
Bright Solar’s flexible solar panels are designed for applications where installation flexibility and reduced weight are important factors.
Solar Panels on RV Roof Installation Process
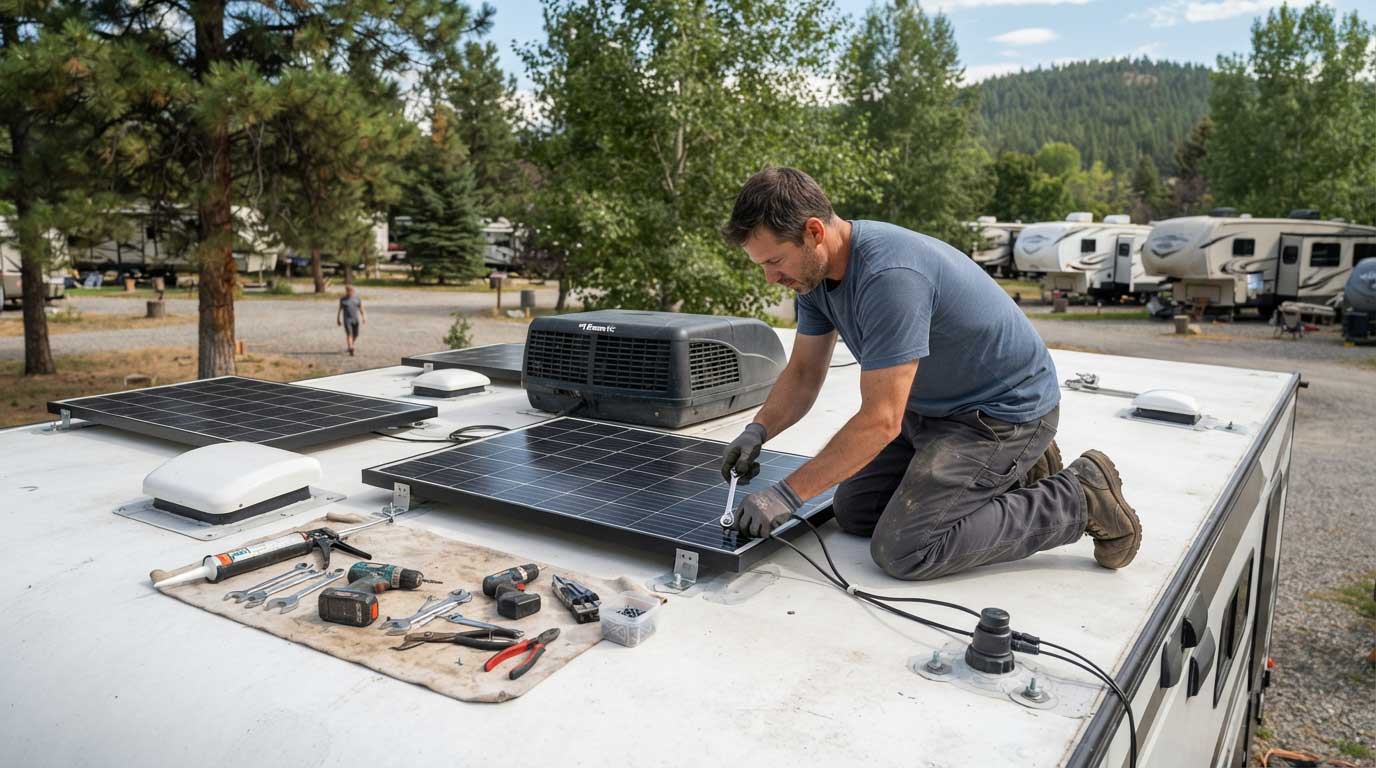
Installing solar panels on an RV roof requires more attention to detail than many beginners expect.
The solar connection itself is usually straightforward.
The difficult parts are:
- Roof sealing
- Cable routing
- Panel positioning
- Weather protection
- Electrical safety
Many RV installation problems appear months later because of poor sealing rather than poor solar performance.
Industry installation guides commonly emphasize four major stages: planning the layout, mounting panels, routing wiring through a protected roof entry point, and connecting the charge controller correctly.”Learn more about the Flexible Solar Panel Installation Guide“
Step 1: Prepare the Roof Surface
Before mounting panels:
- Clean the roof completely.
- Remove dust, oil, and debris.
- Inspect existing sealant.
- Check for damaged areas.
- Confirm the mounting position.
Adhesive or mounting hardware will only perform properly on a suitable surface.
A clean roof is not just about appearance.
It affects long-term reliability.
Step 2: Position Panels Before Permanent Installation
Do not immediately attach the panels.
Place them temporarily first.
Check:
- Morning sunlight exposure
- Afternoon shading
- Distance between panels
- Cable path
- Access around roof equipment
An RV parked in a campground may look sunny at noon but become shaded by trees later in the afternoon.
Solar production follows the sun, not the campsite brochure.
Step 3: Plan Cable Routing
The cable path is one of the most important parts of installation.
A good cable route should be:
- Short
- Protected
- Waterproof
- Easy to maintain
- Away from sharp edges
The roof entry point should use proper sealing methods to prevent water intrusion.
A small roof penetration can become a major problem if not correctly protected.
RV Solar Wiring: Connecting Solar Panels on RV Roof Correctly
Installing solar panels on the roof is only the beginning. The electrical connection determines whether the system performs efficiently and safely.
A rooftop solar system usually connects in this order:
Solar panels → Charge controller → Battery bank → Inverter → RV appliances
Each connection point has a specific role.
A common mistake among first-time RV owners is focusing only on panel wattage while ignoring voltage compatibility. Two systems with identical solar panel wattage can perform very differently depending on wiring configuration, controller type, battery voltage, and cable sizing.
Series vs Parallel Solar Panel Connections for RV
When installing multiple solar panels on an RV roof, panels can usually be connected in series, parallel, or a combination of both.
Series Connection
In a series connection:
- Voltage increases
- Current remains similar
- Higher voltage travels through the cables
Example:
Two 100W panels:
Panel voltage: 18V each
Series connection:
18V + 18V = approximately 36V
Current remains around the same level.
Advantages:
- Lower current loss over longer cable distances
- Smaller cable requirements
- Better performance in many MPPT systems
Disadvantages:
- Shade on one panel can affect the entire series string
Parallel Connection
In a parallel connection:
- Voltage stays the same
- Current increases
Example:
Two 100W panels:
Voltage remains around 18V
Current doubles.
Advantages:
- Better tolerance when one panel receives partial shade
- Simple expansion
Disadvantages:
- Higher current requires thicker wiring
- More attention needed for connectors and protection
For many modern RV solar systems, MPPT charge controllers make higher-voltage panel arrangements attractive because they can convert excess voltage into charging current efficiently.
The National Renewable Energy Laboratory (NREL) explains that maximum power point tracking technology allows photovoltaic systems to operate closer to their optimal power output under changing operating conditions.
Source: https://www.nrel.gov/
Choosing an MPPT or PWM Charge Controller for RV Roof Solar
The charge controller is the communication center between the solar panels and the battery.
Two common types are:
| Controller Type | Characteristics |
|---|---|
| PWM | Simple, lower-cost, works well with smaller matched systems |
| MPPT | Higher efficiency, better for higher-voltage panels and larger systems |
For a small RV with one or two panels, PWM may be acceptable.
For larger rooftop solar arrays, MPPT is often preferred because RV roofs frequently have limited space. The goal is to extract as much usable energy as possible from every square foot.
A typical RV solar system may have:
- 400W solar array
- 12V or 24V battery bank
- MPPT controller
- Inverter for AC appliances
The correct controller size depends on:
- Maximum solar wattage
- Battery voltage
- Maximum PV voltage
- Maximum charging current
Never select a controller only by panel wattage.
Battery Storage for Solar Panels on RV Roof
Solar panels create electricity during sunlight hours.
The battery determines how much of that energy remains available after sunset.
Common RV battery options include:
| Battery Type | Features |
|---|---|
| AGM Lead Acid | Lower cost, heavier, limited usable capacity |
| Gel Battery | Stable operation, slower charging |
| Lithium LiFePO4 | Higher usable capacity, lighter weight, longer cycle life |
Many modern RV solar systems use LiFePO4 batteries because weight and usable capacity are important in mobile applications.
For example:
A 100Ah 12V lithium battery:
12V × 100Ah = approximately 1,200Wh theoretical energy
However, usable energy depends on:
- Battery management system limits
- Temperature
- Discharge settings
- Inverter efficiency
Battery sizing should follow actual energy demand.
A camper who only charges phones and lights has completely different requirements from someone running:
- Refrigerator
- Laptop workstation
- Internet equipment
- Camera batteries
- CPAP equipment
- Small appliances
Real RV Solar Installation Example: 400W Roof System
A practical example comes from a midsize travel trailer designed for extended off-grid camping.
The owner wanted enough electricity for:
- 12V refrigerator
- LED lighting
- Laptop charging
- Camera equipment
- Mobile internet equipment
- Small kitchen devices
The original setup relied heavily on campground hookups.
The final design included:
- Four 100W solar panels
- MPPT charge controller
- 200Ah lithium battery bank
- Pure sine wave inverter
The installation challenge was not the number of panels.
The challenge was roof organization.
The RV roof already contained:
- Air conditioning unit
- Roof vent
- Satellite receiver
- Maintenance access area
Instead of placing panels in a symmetrical layout, the installation team adjusted the arrangement to reduce afternoon shading.
During testing:
- Morning output increased after repositioning
- Cable length was reduced
- Roof access remained available
The owner reported that the system provided enough daily energy for normal electronics and refrigeration during typical sunny conditions.
The lesson was simple:
A better layout often beats a larger system.
How Much Power Can Solar Panels on RV Roof Produce?
The answer depends on:
- Solar panel wattage
- Location
- Season
- Roof angle
- Shading
- Temperature
- Panel orientation
A simple estimate:
Daily Solar Production = Panel Wattage × Peak Sun Hours × System Efficiency
Example:
400W solar array
× 4 peak sun hours
× 80% system efficiency
= approximately 1,280Wh/day
This is a planning estimate, not a guarantee.
The same RV may produce significantly different energy in:
- Arizona summer
- Oregon winter
- Forest campsite
- Open desert
The U.S. Department of Energy notes that solar performance changes due to location, weather, shading, orientation, and system conditions.
Source:
https://www.energy.gov/
Maintaining Solar Panels on RV Roof
RV solar panels experience more environmental exposure than residential rooftop systems.
They encounter:
- Road dust
- Tree pollen
- Bird contamination
- Salt air
- Rain deposits
- Extreme temperatures
Regular inspection helps maintain performance.
Recommended maintenance:
Monthly Checks
- Inspect cable connections
- Check mounting points
- Look for cracks or damage
- Remove visible dirt
Before Long Trips
Check:
- Panel surface condition
- Charge controller status
- Battery voltage
- Roof sealant condition
A small roof seal issue can become more expensive than a solar component replacement.
Flexible Solar Panels for RV Roof Applications
Flexible solar panels are increasingly considered for RV applications because they can solve installation challenges that rigid panels cannot.
They are especially useful when RV owners need:
- Lower roof weight
- Reduced profile
- Easier storage
- Alternative mounting options
However, flexible solar panels still require professional evaluation.
Important specifications include:
| Specification | Why It Matters |
|---|---|
| Rated Power | Determines energy generation |
| Voc | Maximum voltage consideration |
| Vmp | Operating voltage |
| Isc | Short circuit current |
| Imp | Operating current |
| Weight | Roof load planning |
| Dimensions | Roof layout |
| Bending radius | Installation limitations |
A flexible panel should never be treated as a simple sticker attached anywhere.
The installation surface, ventilation, temperature, and electrical connection all affect long-term reliability.
Common Problems With Solar Panels on RV Roof
Even well-designed RV solar systems can experience problems.
Understanding common issues helps avoid unnecessary repairs.
Poor Panel Placement
A panel blocked by:
- Air conditioners
- Roof vents
- Antennas
- Tree shadows
may produce less energy than expected.
The solution is often repositioning rather than adding more panels.
Incorrect Battery Size
A large solar array with a small battery creates wasted energy.
The battery should match the expected daily consumption.
Wrong Charge Controller
Using a controller that cannot handle the panel voltage or current creates reliability problems.
Always check manufacturer specifications.
Poor Roof Sealing
Water leaks are one of the most serious RV installation concerns.
Every roof penetration should be properly sealed and inspected.
How Bright Solar Approaches RV Solar Panel Design
At Bright Solar, RV solar applications are evaluated from the system perspective.
A successful RV solar solution requires balancing:
- Energy requirements
- Panel efficiency
- Roof availability
- Weight limitations
- Installation conditions
- Battery storage
The field experience behind RV solar design often comes from understanding small details:
A cable that is 10 feet longer than necessary.
A vent creating afternoon shade.
A panel placed where maintenance becomes difficult.
These details rarely appear on a product specification sheet, but they determine whether a system performs well after installation.

FAQ About Solar Panels on RV Roof
How many solar panels do I need on my RV roof?
The number of panels depends on your daily electricity usage, battery capacity, roof space, and travel style. Small campers may use one or two panels, while full-time RV travelers often install several hundred watts or more.
Can solar panels on RV roof run an air conditioner?
Most standard RV air conditioners require significant energy. Running AC entirely from solar usually requires a large solar array, substantial battery storage, and a powerful inverter. Many RV owners use solar primarily for smaller loads and reduce AC usage.
Are flexible solar panels good for RV roofs?
Flexible solar panels can be suitable for RV applications where weight, appearance, or mounting flexibility matters. They still require correct electrical matching and proper installation methods.
Should RV solar panels be installed in series or parallel?
Both methods can work. Series connections increase voltage, while parallel connections increase current. The best choice depends on the charge controller, shading conditions, wiring length, and system design.
How long do RV solar panels last?
Solar panel lifespan depends on product quality, environmental exposure, and maintenance. Many photovoltaic modules are designed for decades of operation, with manufacturers commonly providing long-term performance warranties.
Do RV solar panels work on cloudy days?
Yes, but output is reduced. Cloud cover, temperature, shading, and sunlight intensity affect production. Battery storage helps maintain power availability during lower solar conditions.
Can I install solar panels on my RV roof myself?
DIY installation is possible for experienced RV owners, but proper planning is important. Roof sealing, electrical protection, wiring size, and controller compatibility should be carefully considered.
How To Mount Solar Panels On RV Roof?
Mounting solar panels on an RV roof requires proper planning, secure attachment methods, and waterproof installation. The process includes selecting the right mounting method, preparing the roof surface, fixing panels safely, and sealing all connection points to prevent leaks.Learn more about the How To Mount Solar Panels On RV Roof?
How to Install Flexible Solar Panels on RV Roof?
Flexible solar panels are installed on RV roofs using industrial adhesive, proper surface preparation, safe cable routing, and airflow spacing. A well-installed flexible panel can power RV appliances for years without drilling large mounting brackets into the roof.Learn more about the How to Install Flexible Solar Panels on RV Roof?
Conclusion
Solar panels on rv roof provide RV owners with a practical way to generate electricity while traveling beyond traditional campground hookups. The most effective systems are not simply the largest ones; they are carefully designed around energy needs, roof limitations, battery capacity, and real travel conditions.
A reliable RV solar installation starts with understanding daily power consumption, choosing suitable panels, planning roof placement, and ensuring every electrical component works together.
For Bright Solar, RV solar is not only about producing power. It is about creating a dependable energy system that supports freedom on the road.
Related recommendations
-

200W Flexible Solar Panels: Lightweight Off-Grid Power for RVs, Boats, and Van Life
204Explore how 200W flexible solar panels provide lightweight, reliable off-grid energy for RVs, boats, vans, and portable solar systems.
View details -
1000W Solar Panels: Output, Cost, Sizing & Uses
300Learn how 1000w solar panels work, how much electricity they produce, how many panels you need, battery sizing, wiring options, and real-world applications.
View details -
best solar panels for rv (Real Off-Grid Field Guide from Bright Solar)
154best solar panels for rv explained with real camping data, off-grid RV cases, installation insights, and efficiency tips for reliable mobile solar power systems.
View details -
Best Solar Panel Setup for RV and Off-Grid Systems: Complete Guide
270Discover the best solar panel setup for RV and off-grid systems with wiring options, battery sizing, MPPT controllers, and flexible solar panel solutions.
View details