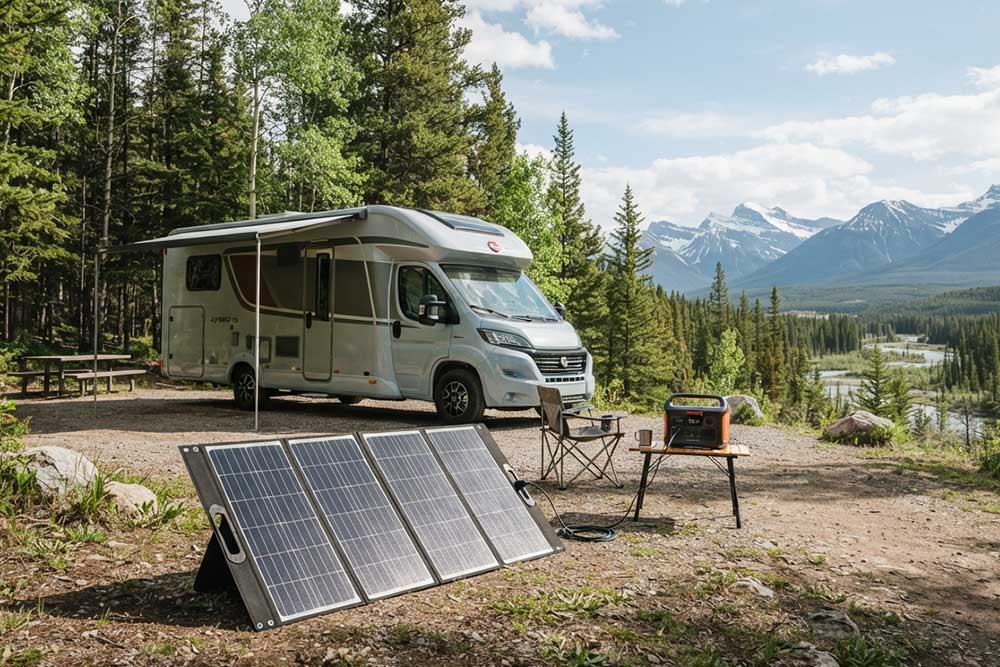
Series and Parallel Solar Panels: How to Connect Solar Panels Correctly
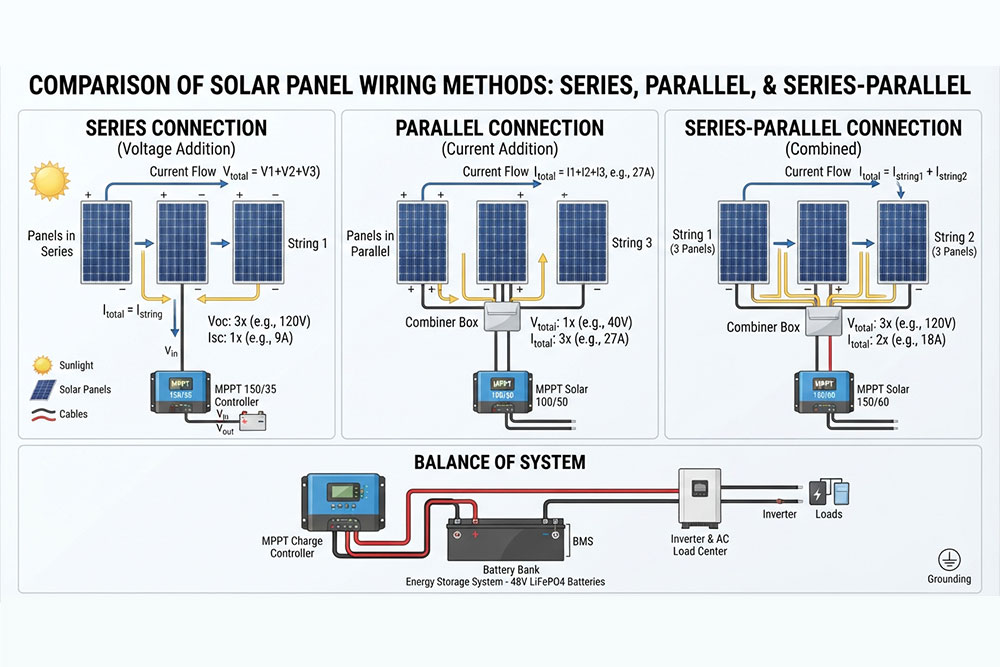
Solar panels can be connected in series to increase voltage, in parallel to increase current, or in a series-parallel configuration to increase both. The correct connection method depends on your battery voltage, charge controller type, cable distance, shading conditions, and overall solar system design.
When designing a photovoltaic (PV) system, many beginners focus only on solar panel wattage. However, the way solar panels are wired has a direct impact on system efficiency, safety, and whether your charge controller can operate correctly.
A 400W solar array can perform very differently depending on whether the panels are connected in series or parallel.
For example:
- A series connection may provide higher voltage for an MPPT charge controller.
- A parallel connection may provide better performance when panels experience different shading conditions.
- A series-parallel configuration can balance voltage and current for larger off-grid systems.
Understanding these differences is essential before connecting solar panels to batteries, charge controllers, RV systems, or residential solar applications.
What Are Series and Parallel Solar Panels?
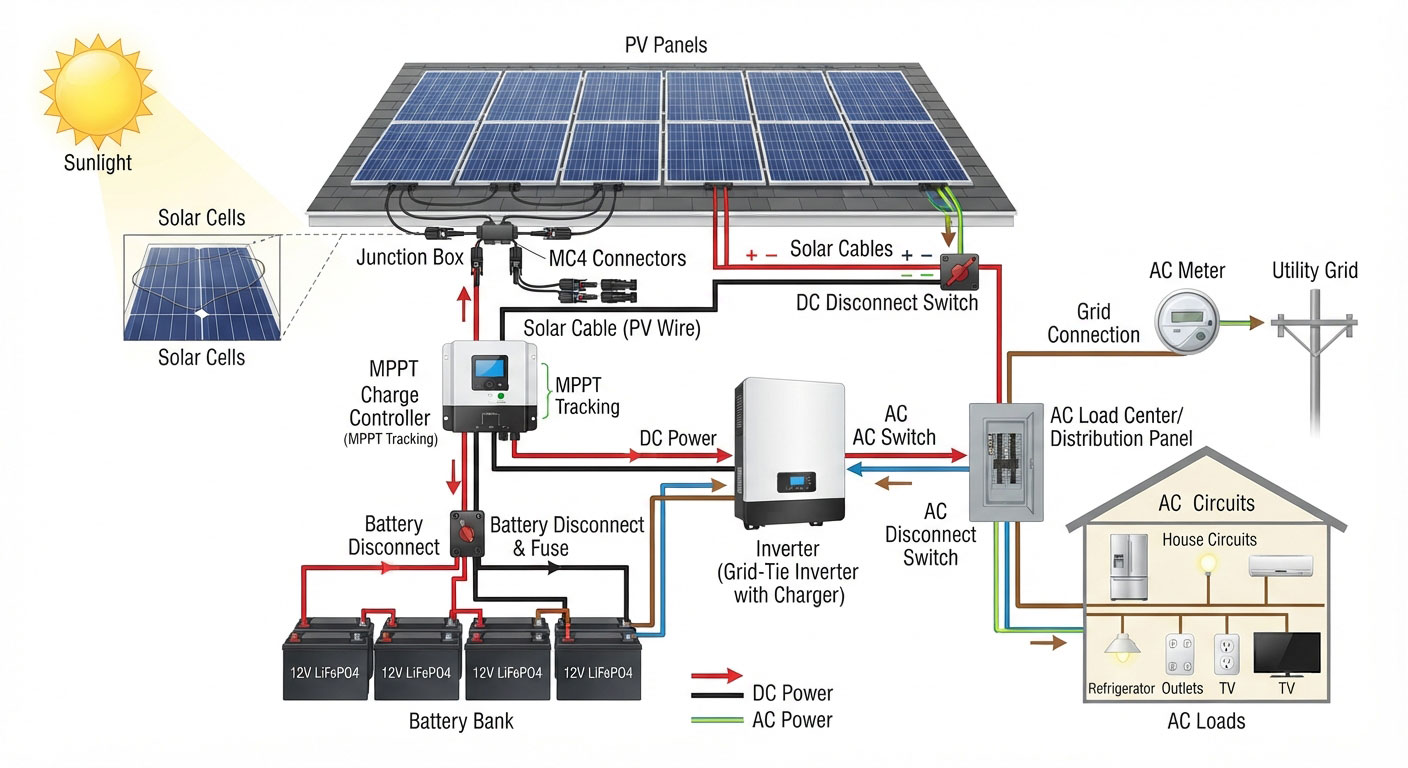
Solar panels generate electricity by converting sunlight into DC power. A complete photovoltaic system usually includes several key components working together:
- Solar panels (PV modules)
- Solar cells
- Junction boxes
- Solar cables
- PV connectors
- Charge controller
- Battery bank
- Inverter
- AC loads
The wiring method determines two important electrical values:
Voltage (V)
Voltage represents electrical pressure that pushes current through a circuit.
Current (A)
Current represents the amount of electrical flow moving through the circuit.
The relationship between voltage and current determines the total power output:
Power (W) = Voltage (V) × Current (A)
For example:
A solar panel rated at:
- 20V
- 10A
produces:
20V × 10A = 200W
When multiple solar panels are connected together, you can increase either voltage, current, or both depending on the wiring method.
How Solar Panels Work Together in a PV System
A typical off-grid solar system works like this:
Solar Panels
↓
Solar Charge Controller
↓
Battery Bank
↓
Inverter
↓
AC Loads
The solar charge controller is the connection point between the PV array and the battery.
Many users ask:
“Can I connect solar panels directly to a battery?”
The answer is no.
Solar panels produce variable voltage depending on sunlight conditions. A charge controller regulates this power and converts it into suitable charging energy for the battery.
According to Victron Energy’s technical documentation, solar chargers are required between solar panels and batteries because direct connection can damage the battery and prevent proper charging control.
Why Solar Panel Wiring Design Matters
Before connecting solar panels, installers normally check:
1. Battery Voltage
Common battery systems include:
- 12V
- 24V
- 48V
2. Charge Controller Type
Two common types:
- PWM charge controller
- MPPT charge controller
MPPT controllers can generally take advantage of higher PV input voltage, making series-connected panels a common choice for many off-grid and RV applications.
3. Installation Environment
The best wiring method also depends on:
- Roof layout
- Partial shading
- Cable distance
- Future expansion plans
For example, Bright Solar flexible solar panels used on RV roofs or marine applications may require different wiring decisions compared with fixed rooftop solar installations because available space and shading patterns are often different.
Solar Panels in Series Explained
Solar panels connected in series increase the total system voltage while keeping the current (amps) the same. This wiring method is commonly used in solar systems that require higher input voltage, especially when paired with MPPT charge controllers, long cable runs, or higher-voltage battery systems.
When designing a solar array, series wiring is not simply about adding more panels together. The final voltage must stay within the operating limits of the charge controller, inverter, and other PV components.
A correctly designed series solar panel configuration can reduce cable losses, improve system efficiency, and simplify wiring for many off-grid and RV applications.
The number of panels connected in series depends on PV voltage limits and charge controller specifications. Learn how to calculate the maximum number of solar panels for your system.
how many solar panels can be connected in series?
How Does Series Solar Panel Wiring Work?
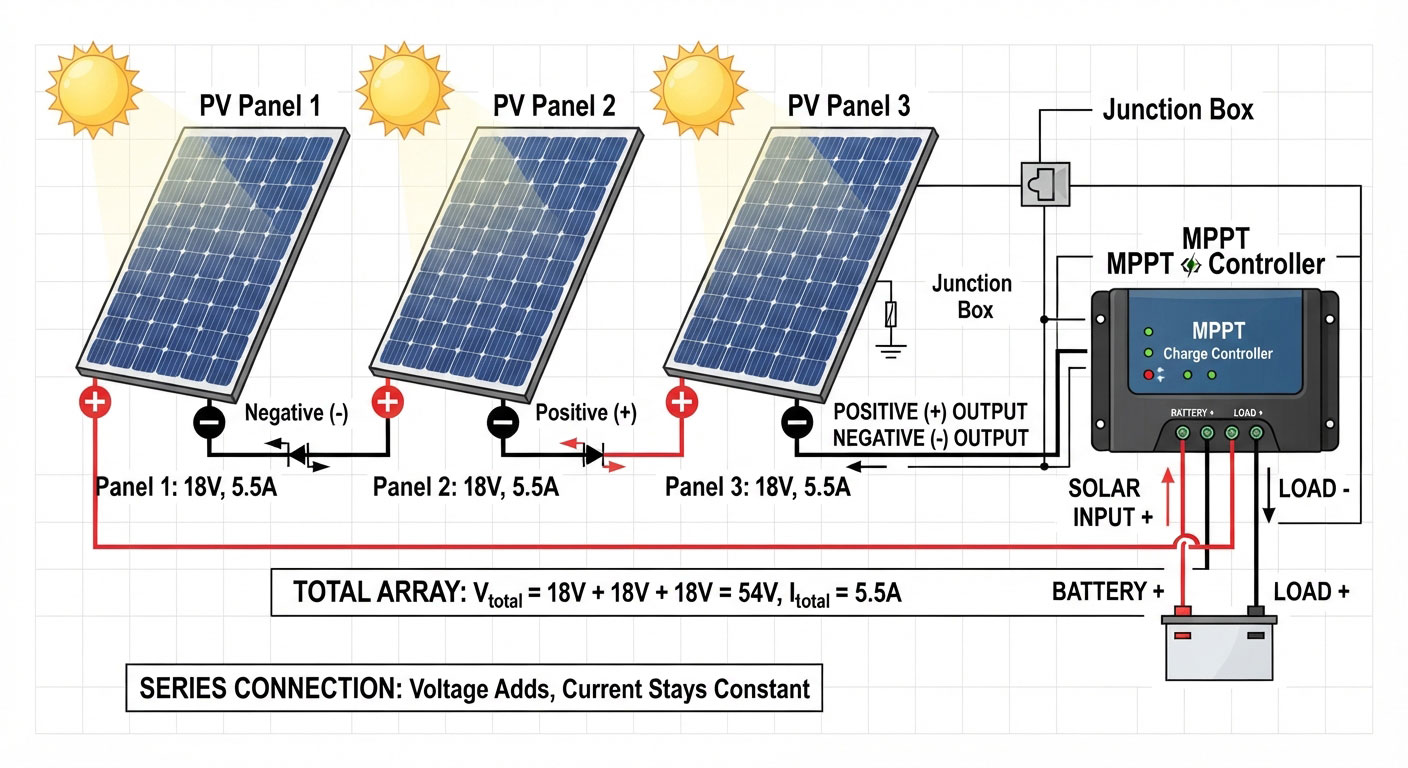
A series connection is created by connecting the positive terminal of one solar panel to the negative terminal of the next panel.
The remaining positive and negative terminals become the output of the solar array.
The basic rule is:
Series connection:
- Voltage increases
- Current remains the same
- Power increases as more panels are added
For example:
A solar panel:
- Voltage: 20V
- Current: 10A
- Power: 200W
Two identical panels connected in series:
Voltage:
20V + 20V = 40V
Current:
10A remains unchanged
Total power:
40V × 10A = 400W
The electrical principle is the same as other DC voltage sources connected in series: voltage adds together while current stays constant.
Series Solar Panel Wiring Example
Assume a small off-grid solar system uses four identical 200W solar panels.
Each panel:
- Maximum power voltage (Vmp): 20V
- Operating current (Imp): 10A
Option 1: Four Panels in Series (4S)
Total voltage:
20V × 4 = 80V
Total current:
10A
System output:
80V × 10A = 800W
This configuration creates a high-voltage, lower-current PV string.
Why choose this design?
Because increasing voltage allows the same amount of power to travel with lower current.
According to the electrical relationship:
Power loss = Current² × Resistance
Higher current creates more heat loss in cables. Therefore, increasing voltage and reducing current can help improve transmission efficiency, especially when panels are installed far away from the charge controller.
Advantages of Connecting Solar Panels in Series
1. Higher Voltage Output
The biggest advantage of series solar panels is increased voltage.
Many solar components, especially MPPT charge controllers and grid-tied inverters, require a specific PV input voltage range.
For example:
A 12V battery system may work better with a higher-voltage solar array because the charge controller has more voltage headroom to convert solar energy efficiently.
2. Lower Current Reduces Cable Size
A higher-voltage PV array produces the same power with lower current.
Example:
400W solar array:
Low voltage system:
20V × 20A
Higher voltage system:
80V × 5A
Both produce:
400W
However, the second design has lower current flowing through the cable, which can reduce voltage drop and allow more practical cable sizing.
This is one reason many professional solar installations prefer series connections when cable distances are longer.
3. Better Compatibility With MPPT Charge Controllers
MPPT (Maximum Power Point Tracking) charge controllers are designed to optimize power extraction from solar panels by adjusting the operating point of the PV array.
Series-connected solar panels usually provide a higher PV voltage input, which gives MPPT controllers more operating range.
This makes series wiring popular for:
- RV solar systems
- Marine solar systems
- Off-grid cabins
- Larger battery banks
For Bright Solar flexible solar panels used in RV and marine environments, series wiring can be an effective solution when the system uses an MPPT controller and sufficient roof space is available.
Disadvantages of Series Solar Panels
Although series wiring has many advantages, it is not suitable for every installation.
1. Shading Can Reduce System Performance
In a series string, all panels share the same current path.
If one panel receives significantly less sunlight because of:
- tree shadows
- roof obstacles
- antenna equipment
- uneven panel placement
the output of the entire string can be affected.
Solar installers often consider shading patterns before deciding between series and parallel configurations.
For example:
An RV roof may have:
- air conditioner vents
- skylights
- roof racks
In this situation, parallel wiring or a series-parallel design may sometimes provide better performance.
2. Higher Voltage Requires More Care
Series-connected solar panels create higher DC voltage.
Before installation, always check:
- Maximum PV input voltage of the charge controller
- Open circuit voltage (Voc) of each panel
- Temperature effects on voltage
- Connector and cable ratings
Cold temperatures can increase PV voltage, so system designers normally use the highest expected Voc when checking equipment limits.
When Should You Use Solar Panels in Series?
Series solar panels are usually a good choice when:
You Use an MPPT Charge Controller
MPPT controllers generally work well with higher PV voltage input.
You Have Long Cable Distance
Higher voltage helps reduce current and minimize cable losses.
You Need Higher System Voltage
Common applications include:
- 24V battery systems
- 48V battery systems
- Larger off-grid solar setups
Your Panels Receive Similar Sunlight
Series works best when panels have similar:
- orientation
- tilt angle
- sunlight exposure
Series Solar Panels for RV and Off-Grid Systems
For RV solar installations, the choice between series and parallel depends on the complete system design.
Example:
Two 200W flexible solar panels installed on an RV roof:
Series Connection
Panel 1:
20V / 10A
Panel 2:
20V / 10A
Combined output:
40V / 10A
Advantages:
- lower current
- smaller cable requirements
- efficient MPPT operation
Parallel Connection
Combined output:
20V / 20A
Advantages:
- better tolerance when one panel experiences partial shading
- easier expansion for some small systems
The best choice depends on:
- battery voltage
- charge controller specifications
- roof conditions
- shading environment
Bright Solar flexible solar panels are designed for applications where installation space and weight matter, including RV, marine, and off-grid solar systems. Choosing the correct wiring method helps maximize the performance of the complete PV system rather than only focusing on panel wattage.
Solar Panels in Parallel Explained
Solar panels connected in parallel increase the total current (amps) while keeping the voltage the same. This wiring method is commonly used when a solar system requires higher current output, easier expansion, or better performance under partial shading conditions.
Compared with series connections, parallel solar panel wiring creates a lower-voltage, higher-current PV array. It is often used in smaller solar systems, RV setups, marine applications, and installations where panels may experience different sunlight conditions.
However, increasing current also means the system requires careful consideration of cable size, connectors, fuses, and charge controller capacity.
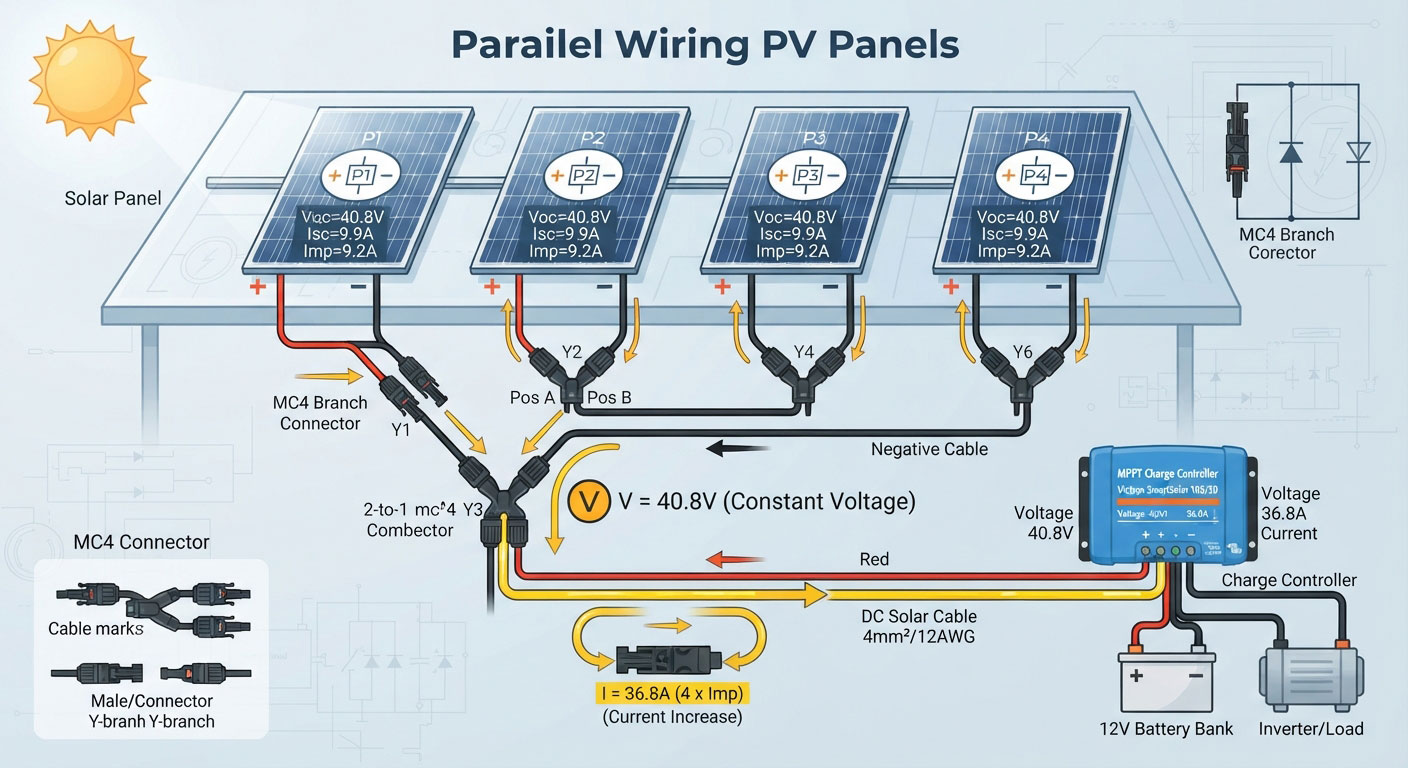
How Does Parallel Solar Panel Wiring Work?
A parallel connection is created by connecting all positive terminals of solar panels together and all negative terminals together.
The output voltage remains the same as a single panel, while the current from each panel is added together.
The basic rule is:
Parallel connection:
- Voltage remains the same
- Current increases
- Total power increases
Example:
One solar panel:
- Voltage: 20V
- Current: 10A
- Power: 200W
Two identical panels connected in parallel:
Voltage:
20V remains unchanged
Current:
10A + 10A = 20A
Total power:
20V × 20A = 400W
The electrical principle is that parallel circuits provide additional current paths while maintaining the same voltage level. (energyeducation.ca)
Connecting PV Panels in Parallel: Wiring Method
The typical parallel wiring process is:
Solar Panel Positive (+)
↓
Positive Branch Connector
↓
Charge Controller PV Positive Input
Solar Panel Negative (-)
↓
Negative Branch Connector
↓
Charge Controller PV Negative Input
For multiple panels, installers often use:
- MC4 Y branch connectors
- PV combiner boxes
- Solar fuses
- Properly rated PV cables
MC4 connectors are widely used in photovoltaic systems because they provide secure, weather-resistant connections for outdoor solar installations. The original MC4 connector was developed by Stäubli and is commonly used in PV applications worldwide.
(staubli.com)
Parallel Solar Panel Wiring Example
Assume a small solar system uses three identical 200W solar panels.
Each panel:
- Voltage: 20V
- Current: 10A
Connected in parallel:
Total voltage:
20V
Total current:
10A + 10A + 10A = 30A
Total power:
20V × 30A = 600W
The system produces more current while maintaining the same operating voltage.
This design can work well when the charge controller and wiring are correctly sized for the higher current output.
Advantages of Connecting Solar Panels in Parallel
1. Better Performance Under Partial Shading
One major advantage of parallel solar panels is improved tolerance when individual panels receive different amounts of sunlight.
For example:
An RV roof may have:
- air conditioner shadows
- roof vents
- satellite equipment
- uneven parking conditions
With parallel wiring, each panel operates more independently.
If one panel produces less power because of shade, other panels can continue generating electricity.
However, shading effects depend on the specific module design, bypass diodes, and system configuration. Parallel wiring does not completely eliminate shading losses.
2. Easier System Expansion
Parallel connections make it relatively simple to add additional solar panels later.
For example:
An RV owner may start with:
2 × 100W panels
Later expand to:
4 × 100W panels
The voltage remains the same while the available current increases.
This flexibility is useful for:
- camper solar systems
- portable solar setups
- small off-grid applications
3. Works Well With Lower Voltage Systems
Parallel wiring is often suitable for systems using:
- 12V batteries
- PWM charge controllers
- small solar applications
For example:
A 12V battery bank with solar panels designed around similar voltage levels may use parallel wiring to increase charging current.
Disadvantages of Parallel Solar Panels
Although parallel connections are useful, they also introduce several design challenges.
1. Higher Current Requires Larger Cables
Because parallel systems increase current, the cables must handle higher electrical flow.
Higher current creates greater voltage drop over long cable distances.
For example:
400W solar array:
Option A:
20V × 20A
Option B:
80V × 5A
Both produce similar power, but Option A requires cables capable of carrying four times the current.
This is why larger solar systems often increase voltage rather than only increasing current.
2. More Complex Protection Requirements
Parallel solar arrays may require additional protection components, including:
- string fuses
- circuit breakers
- combiner boxes
The exact requirements depend on:
- number of parallel strings
- panel specifications
- local electrical standards
Professional PV system designs consider overcurrent protection before connecting multiple solar panels together.
3. Lower Voltage May Limit Equipment Compatibility
Some MPPT charge controllers require a minimum PV voltage to begin operation or achieve optimal efficiency.
A parallel array may not provide enough voltage for certain system designs, especially when:
- cable runs are long
- battery voltage is high
- energy demand is large
Always check:
- PV input voltage range
- maximum current rating
- battery voltage compatibility
Series vs Parallel Solar Panels: When Is Parallel Better?
Parallel solar panels are usually a better choice when:
The Installation Has Partial Shading
Examples:
- RV roofs with obstacles
- boats with equipment mounted nearby
- residential roofs with different orientations
The System Uses a Low Voltage Battery
Examples:
- 12V RV batteries
- small off-grid systems
Future Expansion Is Important
Parallel wiring allows additional panels to be added without significantly changing system voltage.
Parallel Solar Panels for RV and Flexible Solar Applications
Flexible solar panels are popular in RV and marine applications because they can fit curved surfaces and limited installation areas.
However, RV environments often create unique challenges:
- moving shadows
- roof accessories
- limited panel spacing
For example:
A camper installs two 200W flexible solar panels.
Parallel configuration:
Voltage:
20V
Current:
20A
Advantages:
- each panel contributes independently
- easier troubleshooting
- suitable for some 12V systems
Series configuration:
Voltage:
40V
Current:
10A
Advantages:
- lower current
- better cable efficiency
- often suitable with MPPT controllers
The correct choice depends on the RV electrical architecture.
Bright Solar flexible solar panels are commonly used in RV, marine, and off-grid applications where system designers must balance available space, weight, energy demand, and wiring efficiency.
Key Takeaways: Parallel Solar Panel Wiring
Parallel solar panels:
✓ Increase current
✓ Keep voltage the same
✓ Can improve flexibility in shaded environments
✓ Are suitable for many 12V applications
✓ Require careful cable and protection design
Before choosing parallel wiring, always check:
- solar panel voltage
- charge controller current rating
- cable size
- battery voltage
- installation conditions
Series-Parallel Solar Panel Connections Explained
Series-parallel solar panel connections combine the advantages of both wiring methods. This configuration increases both voltage and current, making it suitable for larger photovoltaic (PV) systems where a single series or parallel connection cannot provide the required electrical performance.
Instead of connecting all solar panels in one long series string or one large parallel group, installers create multiple smaller series strings and then connect those strings in parallel.
This approach is widely used in:
- Off-grid solar systems
- RV solar installations
- Marine solar systems
- Residential PV arrays
- Commercial solar projects
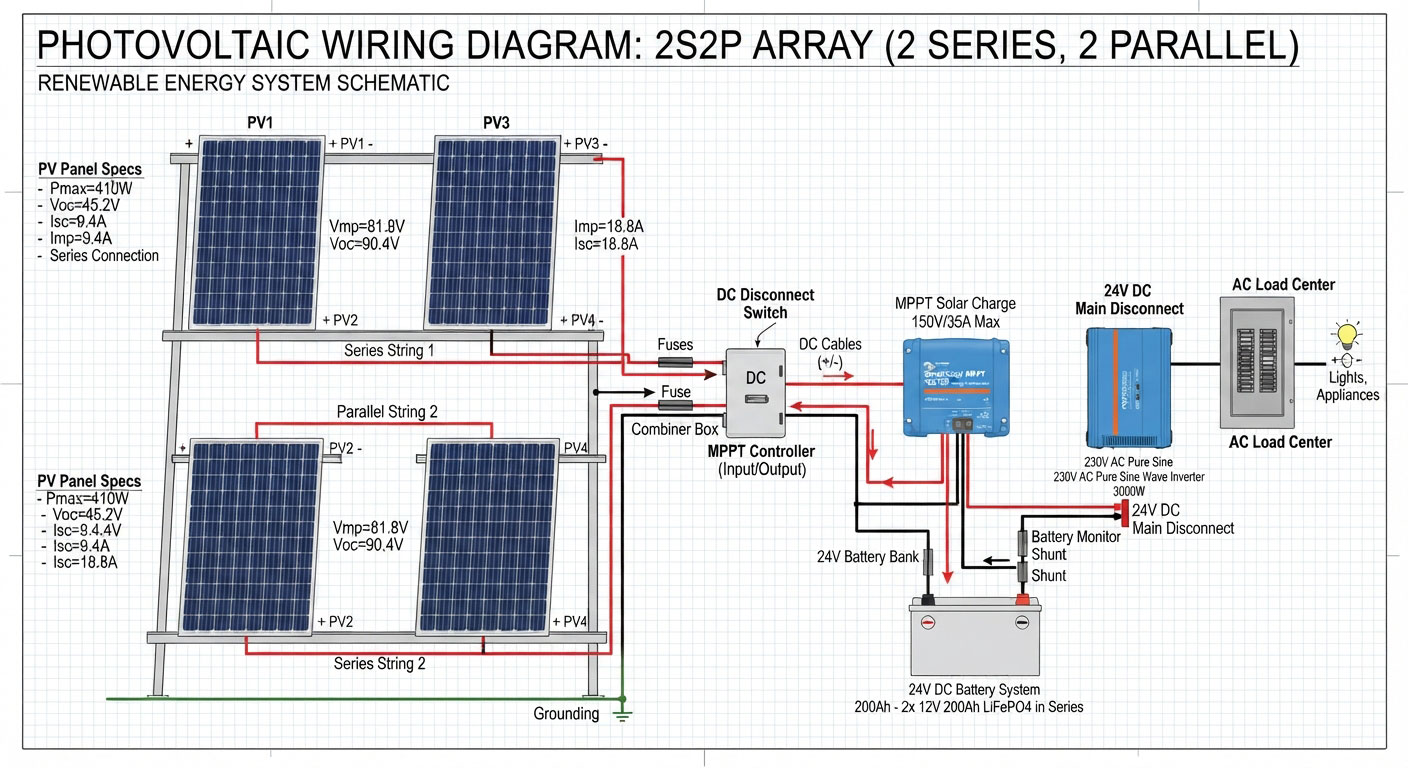
What Is a Series-Parallel Solar Panel Configuration?
A series-parallel connection combines two steps:
Step 1: Connect solar panels in series to increase voltage.
Step 2: Connect multiple series strings in parallel to increase current.
This allows system designers to adjust both voltage and current according to:
- Battery voltage
- Charge controller specifications
- Inverter requirements
- Cable distance
- Energy demand
The basic structure:
String 1:
Panel + Panel + Panel
↓
Higher voltage output
String 2:
Panel + Panel + Panel
↓
Higher voltage output
Then:
String 1 + String 2
↓
Higher current output
The final result is a balanced increase in voltage and current.
How Does Series-Parallel Solar Wiring Work?
Assume a system uses four identical solar panels.
Each panel:
- Power: 200W
- Voltage: 20V
- Current: 10A
There are several possible connection methods.
Option 1: All Panels in Series (4S)
Voltage:
20V × 4 = 80V
Current:
10A
Total power:
80V × 10A = 800W
Advantages:
- Highest voltage
- Lowest current
- Lower cable losses
Limitations:
- More sensitive to shading
- Requires higher PV voltage equipment
Option 2: All Panels in Parallel (4P)
Voltage:
20V
Current:
10A × 4 = 40A
Total power:
20V × 40A = 800W
Advantages:
- Better independent panel performance
- Lower operating voltage
Limitations:
- Requires larger cables
- Higher current protection requirements
Option 3: Series-Parallel Connection (2S2P)
First, create two series strings:
String A:
Panel 1 + Panel 2
Voltage:
20V + 20V = 40V
Current:
10A
String B:
Panel 3 + Panel 4
Voltage:
40V
Current:
10A
Then connect the two strings in parallel:
Final output:
Voltage:
40V
Current:
20A
Power:
40V × 20A = 800W
This design provides a middle solution between pure series and pure parallel wiring.
Why Use Series-Parallel Solar Panel Connections?
1. Balance Voltage and Current Requirements
Large solar systems often have competing requirements.
Higher voltage helps:
- reduce current
- reduce cable losses
- improve transmission efficiency
Higher current helps:
- increase charging capability
- support larger loads
A series-parallel configuration allows designers to optimize both.
2. Better System Scalability
As solar systems grow, connecting all panels in one configuration may become impractical.
For example:
A small RV system may only need:
2 × 200W panels
A larger off-grid cabin may require:
8 × 200W panels
Using series-parallel wiring allows the system to expand while keeping voltage within the operating range of the charge controller.
3. Improved Compatibility With MPPT Controllers
MPPT charge controllers usually perform best when the PV input voltage is higher than the battery charging voltage.
A series-parallel array can provide:
- sufficient PV voltage
- manageable current
- efficient charging performance
For example:
A 48V battery system generally requires a higher solar input voltage compared with a 12V battery system.
The correct PV configuration depends on the MPPT controller’s maximum input voltage and current limits.
Victron Energy’s MPPT design guidelines emphasize selecting PV array voltage and current according to the charge controller’s rated electrical limits.
(victronenergy.com)
Series-Parallel Solar Panels for RV Systems
Many RV owners choose series-parallel wiring when they need more power but have limited roof space.
Example:
Four flexible solar panels installed on an RV:
Configuration:
2S2P
Each panel:
200W
Total system:
800W
Electrical output:
Voltage:
40V
Current:
20A
Advantages:
- suitable for MPPT controllers
- balanced voltage and current
- easier cable management
- flexible expansion options
This configuration can be especially useful when RV users combine:
- flexible solar panels
- lithium batteries
- MPPT charge controllers
- inverter systems
Bright Solar flexible solar panels are designed for applications where weight, installation space, and system flexibility are important. In RV and off-grid projects, series-parallel wiring can help designers create a practical balance between solar generation capacity and electrical system requirements.
How to Choose Between Series, Parallel, and Series-Parallel?
Before selecting a wiring method, evaluate five factors:
1. Battery Voltage
Typical systems:
| Battery System | Common Wiring Consideration |
|---|---|
| 12V | Parallel or small series systems |
| 24V | Series or series-parallel |
| 48V | Higher voltage series-based arrays |
2. Charge Controller Type
PWM Controller
Usually works better with solar panels whose voltage closely matches the battery system.
MPPT Controller
Can take advantage of higher PV voltage and is commonly paired with series or series-parallel arrays.
3. Available Installation Space
RV and marine systems often have irregular mounting areas.
Consider:
- roof shape
- shadows
- panel orientation
- cable routing
4. Cable Distance
Longer cable distances usually benefit from higher-voltage designs because lower current reduces voltage drop.
5. Future Expansion Plans
If you plan to add more panels later, design the system with enough:
- charge controller capacity
- roof space
- wiring capability
Common Mistakes When Designing Series-Parallel Solar Arrays
Mistake 1: Mixing Incompatible Panels
Solar panels connected together should ideally have similar:
- voltage characteristics
- current ratings
- electrical specifications
Mixing very different panels can reduce overall system performance.
Mistake 2: Exceeding Charge Controller Limits
Always check:
- maximum PV voltage
- maximum PV current
- maximum charging current
A larger solar array is not useful if the controller cannot safely process the input.
Mistake 3: Ignoring Temperature Effects
Solar panel voltage changes with temperature.
Cold temperatures can increase open-circuit voltage (Voc), so system designers should calculate the maximum possible PV voltage before installation.
The National Renewable Energy Laboratory (NREL) provides PV system modeling resources that consider temperature effects and electrical characteristics of photovoltaic modules.
(nrel.gov)
Series-Parallel Connection Summary
A series-parallel solar panel configuration:
✓ Increases voltage and current
✓ Provides flexible system design
✓ Works well for larger solar arrays
✓ Supports RV and off-grid applications
✓ Helps balance efficiency and scalability
For many modern solar installations, the question is not simply:
“Series or parallel?”
The better question is:
“What voltage and current configuration best matches the complete solar system?”
Solar Panels in Series vs Parallel: Complete Comparison Guide
Choosing between series and parallel solar panels is one of the most important decisions when designing a photovoltaic (PV) system. Both connection methods can deliver the same total power output, but they affect system voltage, current, cable requirements, shading performance, and charge controller compatibility differently.
There is no universal answer that one wiring method is always better. The correct choice depends on the complete system design, including:
- Battery voltage
- Solar charge controller type
- Installation environment
- Cable distance
- Shading conditions
- Future expansion requirements
For example, a small 12V RV system may benefit from parallel wiring, while a larger off-grid system using an MPPT controller may perform better with series or series-parallel connections.
Series vs Parallel Solar Panels: Key Differences
The fundamental difference is how voltage and current behave.
Before choosing a wiring method, it is important to understand the differences between solar panels in series and parallel. Our detailed guide explains how voltage, current, efficiency, and shading performance compare between the two configurations.
| Feature | Solar Panels in Series | Solar Panels in Parallel |
|---|---|---|
| Voltage | Increases | Remains the same |
| Current | Remains the same | Increases |
| Power Output | Increases | Increases |
| Cable Current | Lower | Higher |
| Cable Size Requirement | Usually smaller | Usually larger |
| Shading Impact | Higher sensitivity | Better tolerance |
| Common Controller Match | MPPT | PWM / MPPT |
| Best Application | Higher voltage systems | Lower voltage systems |
The electrical relationship is straightforward:
Series connection:
Voltage adds together.
Example:
20V + 20V + 20V = 60V
Current remains:
10A
Parallel connection:
Current adds together.
Example:
10A + 10A + 10A = 30A
Voltage remains:
20V
Voltage vs Current: Why Does It Matter?
Many beginners choose solar panels only by wattage.
However, wattage alone does not determine whether a solar array will work correctly.
The basic formula is:
Power (W) = Voltage (V) × Current (A)
A 600W solar system can have different electrical designs.
Example:
Design A: Lower Voltage, Higher Current
20V × 30A = 600W
Design B: Higher Voltage, Lower Current
60V × 10A = 600W
Both produce the same power.
However, Design B usually has advantages for longer cable distances because lower current creates less electrical loss.
According to electrical principles, cable power loss increases with the square of current:
Power Loss = I² × R
where:
- I = current
- R = resistance
This is why many larger solar installations increase voltage rather than simply increasing current.
Reference:
National Renewable Energy Laboratory (NREL) PV system resources
https://www.nrel.gov/pv/
Efficiency Comparison: Series vs Parallel Solar Panels
Series Connection Efficiency
Advantages:
- Lower current loss
- Smaller cable requirements
- Better for longer distances
Example:
An RV places solar panels on the roof while the charge controller is installed several meters away near the battery compartment.
A higher-voltage series configuration can reduce voltage drop between the panels and controller.
Parallel Connection Efficiency
Advantages:
- Better independent panel operation
- Easier troubleshooting
- Suitable for systems with different shading conditions
However, because current is higher, installers need to consider:
- cable thickness
- connector ratings
- fuse protection
Series vs Parallel Solar Panels Under Shading Conditions
Shading is one of the biggest factors affecting solar panel wiring decisions.
Series Solar Panels and Shading
In a series string, current flows through all connected panels.
If one panel receives less sunlight:
- the string output may decrease
- the entire series string can be affected
Examples:
- tree shadows
- RV roof vents
- air conditioners
- antennas
Modern solar panels usually include bypass diodes that help reduce the impact of partial shading, but they do not completely eliminate energy losses.
Parallel Solar Panels and Shading
Parallel connections allow each panel to operate more independently.
If one panel is shaded:
- other panels can continue producing power
This can be useful for:
- RV roofs with obstacles
- boats
- uneven mounting locations
However, parallel wiring is not immune to shading losses. Panel orientation, bypass diode design, and system layout still affect performance.
Series vs Parallel Solar Panels for MPPT and PWM Controllers
The charge controller is a key factor when choosing a solar panel connection method.
Series Panels With MPPT Charge Controllers
MPPT means:
Maximum Power Point Tracking
MPPT controllers adjust the electrical operating point of solar panels to maximize energy harvest under changing conditions.
Higher PV voltage input allows many MPPT controllers to operate more efficiently, especially in larger systems.
Series solar panels are commonly used with:
- RV MPPT systems
- off-grid cabins
- lithium battery systems
- higher-voltage solar arrays
Before installation, always confirm:
- maximum PV input voltage
- maximum charging current
- recommended operating range
Reference:
Victron Energy MPPT charge controller documentation
https://www.victronenergy.com/solar-charge-controllers
Parallel Panels With PWM Charge Controllers
PWM means:
Pulse Width Modulation
PWM controllers typically work best when solar panel voltage is close to battery voltage.
For example:
A 12V battery system may commonly use solar panels designed around similar voltage ranges.
Parallel wiring can be suitable because it increases charging current without significantly increasing system voltage.
However, PWM controllers generally provide less flexibility compared with MPPT controllers when panel voltage is significantly higher than battery voltage.
Which Is Better for RV Solar Panels?
RV solar systems have unique requirements:
- Limited roof space
- Weight restrictions
- Moving shadows
- Battery storage limitations
There are three common approaches.
Option 1: Parallel RV Solar Panels
Suitable for:
- small 12V battery systems
- simple installations
- locations with partial shading
Advantages:
✓ Simple wiring
✓ Easy expansion
✓ Better panel independence
Option 2: Series RV Solar Panels
Suitable for:
- MPPT controllers
- longer cable distances
- higher efficiency designs
Advantages:
✓ Lower current
✓ Reduced cable losses
✓ Better voltage headroom
Option 3: Series-Parallel RV Solar Panels
Suitable for:
- larger RV solar systems
- multiple flexible panels
- lithium battery setups
Advantages:
✓ Balanced voltage and current
✓ Scalable design
✓ Better system optimization
For example:
Four Bright Solar flexible solar panels installed on an RV roof can be configured as 2S2P depending on the MPPT controller specifications and battery voltage.
Choosing the Right Solar Panel Connection Method
Use this simple decision process:
Choose Series When:
✓ You use an MPPT controller
✓ Cable distance is long
✓ You need higher PV voltage
✓ Panels receive similar sunlight
Choose Parallel When:
✓ You use a small 12V system
✓ Panels experience different shading
✓ You want simple expansion
✓ Current requirements are manageable
Choose Series-Parallel When:
✓ You need more solar power
✓ The system is medium or large
✓ You need both higher voltage and current
Bright Solar Application Consideration
Bright Solar flexible solar panels are designed for applications where installation flexibility matters, including:
- RV solar systems
- marine applications
- portable power solutions
- off-grid energy systems
For these applications, the best wiring method depends on more than panel wattage.
A properly designed system should match:
- solar panel specifications
- charge controller limits
- battery voltage
- installation environment
The goal is not simply to connect more panels.
The goal is to create a reliable solar system that produces stable energy in real-world conditions.
How to Connect Solar Panels to a Charge Controller and Battery
Connecting solar panels to a battery requires more than simply joining positive and negative wires together. A safe and efficient solar system uses a charge controller between the PV panels and the battery to regulate charging voltage, protect the battery, and optimize energy production.
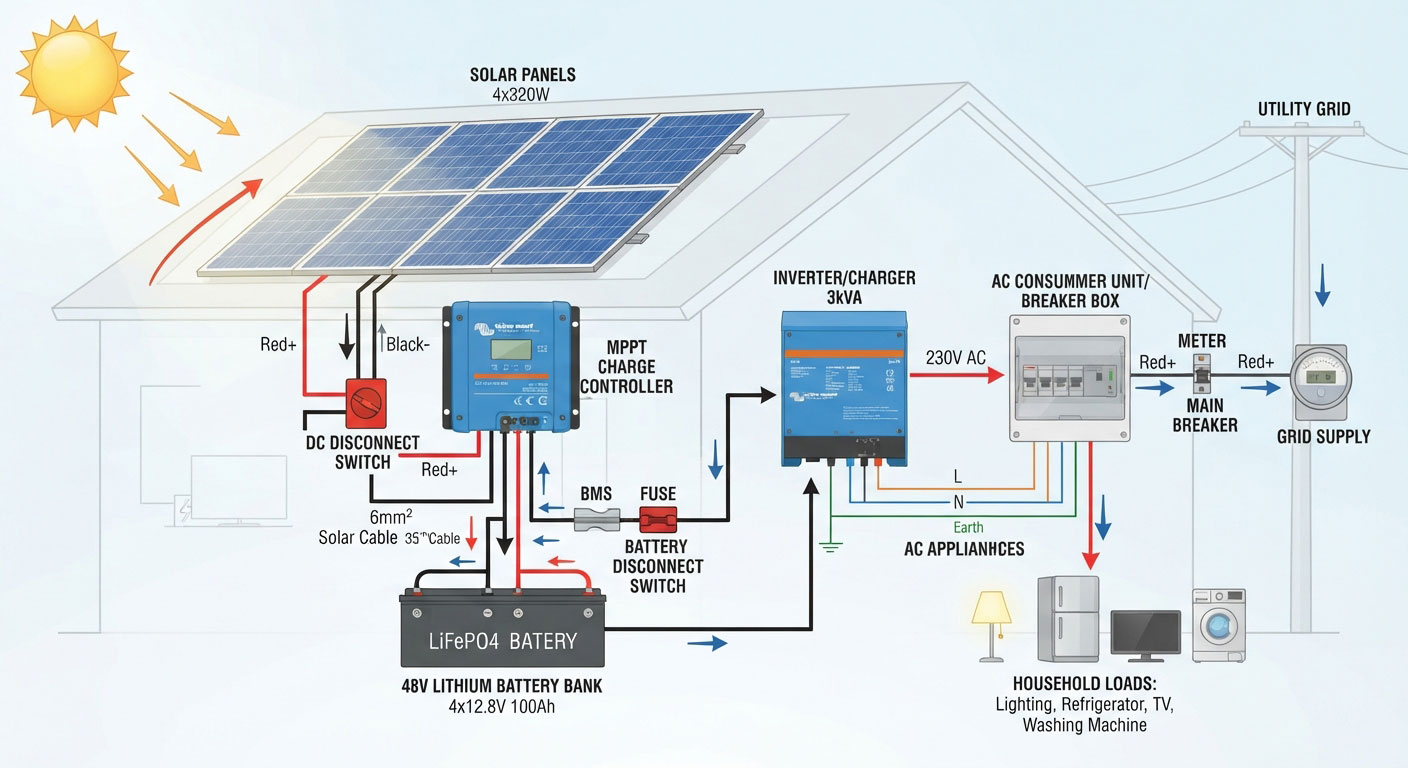
The standard connection sequence is:
Solar Panels → Solar Charge Controller → Battery → Inverter → AC Loads
This configuration is used in many off-grid, RV, marine, and portable solar systems.
According to Victron Energy’s electrical system guidelines, solar chargers are installed between PV modules and batteries to control charging and prevent improper battery operation.
Source: https://www.victronenergy.com/media/pg/The_Wiring_Unlimited_book/en/dc-wiring.html
Solar Panel to Battery Connection Diagram
A basic solar charging system includes four main stages:
Stage 1: Solar Panel Generates DC Power
Solar panels convert sunlight into direct current (DC) electricity.
The output voltage changes depending on:
- sunlight intensity
- panel temperature
- electrical load
- panel specifications
A solar panel label normally includes:
- Maximum power (Pmax)
- Open circuit voltage (Voc)
- Maximum power voltage (Vmp)
- Short circuit current (Isc)
- Maximum power current (Imp)
These specifications determine how panels should be connected.
Stage 2: Solar Charge Controller Regulates Power
The charge controller manages electricity flowing from the solar panels to the battery.
Its main functions include:
- regulating charging voltage
- preventing battery overcharging
- protecting against reverse current
- improving energy harvesting
The two common charge controller types are:
PWM Charge Controller
PWM controllers are simpler and usually work best when panel voltage is close to battery voltage.
Common applications:
- small 12V systems
- basic RV setups
- low-power solar applications
MPPT Charge Controller
MPPT controllers can convert excess PV voltage into additional charging current, allowing more flexible solar panel configurations.
Common applications:
- larger RV systems
- off-grid cabins
- lithium battery systems
- higher-power solar arrays
Source:
Victron Energy MPPT charge controller information
https://www.victronenergy.com/solar-charge-controllers
Step-by-Step: How to Connect Solar Panels to Battery
After selecting the correct series or parallel configuration, the next step is connecting the PV array safely to the charge controller. Learn the complete connection process in our solar charge controller wiring guide.
Step 1: Check Solar Panel and Battery Specifications
Before wiring, confirm:
Solar panel:
- Voc
- Vmp
- Isc
- Imp
- maximum system voltage
Battery:
- voltage rating
- chemistry type
- capacity
Common battery voltages:
- 12V
- 24V
- 48V
The solar array voltage must match the charge controller operating range.
Step 2: Connect Battery to Charge Controller First
For many charge controllers, the recommended installation sequence is:
- Connect battery to charge controller
- Connect solar panels to charge controller
The battery connection allows the controller to recognize system voltage before receiving PV input.
Always follow the specific manufacturer installation manual because connection procedures vary by product.
Step 3: Connect Solar Panels to Charge Controller
After the battery connection is complete:
Connect:
Solar panel positive (+)
↓
Charge controller PV positive (+)
Solar panel negative (-)
↓
Charge controller PV negative (-)
For multiple solar panels:
Series connection:
Panel (+)
↓
Panel (-)
Parallel connection:
All positive terminals together
All negative terminals together
Use properly rated PV cables and connectors for outdoor environments.
Step 4: Connect Battery Bank to Inverter
After the battery is connected and charging correctly:
Battery
↓
Inverter
↓
AC appliances
The inverter converts stored DC energy into AC electricity for household appliances.
Examples:
- lights
- refrigerators
- laptops
- pumps
Solar Panel Connector Types Used in Battery Systems
A reliable solar connection depends heavily on proper connectors and wiring components.
MC4 Solar Connectors
MC4 connectors are among the most widely used PV connectors.
They provide:
- weather-resistant connection
- secure locking mechanism
- outdoor durability
Original MC4 connectors were developed by Stäubli and are widely used in photovoltaic installations.
Source:
https://www.staubli.com/us/en/electrical-connectors/industries/renewable-energy/the-original-mc4.html
Common uses:
- solar panel output cables
- extension cables
- parallel branch connections
MC4 Y Branch Connectors
Y connectors are commonly used for parallel solar panel wiring.
Example:
Two panels:
Panel A (+)
Panel B (+)
↓
Charge controller (+)
The same applies to negative connections.
Applications:
- RV solar panels
- portable solar systems
- small off-grid arrays
Solar Combiner Boxes
For larger systems, multiple solar strings may connect through a combiner box.
Functions include:
- combining PV strings
- overcurrent protection
- easier maintenance
Common in:
- residential solar
- commercial systems
- larger off-grid installations
Connecting Flexible Solar Panels to Batteries
Flexible solar panels are often used where traditional rigid panels are difficult to install.
Common applications:
- RV roofs
- boats
- camper vans
- remote equipment
The connection process is similar:
Flexible Solar Panel
↓
PV Cable / MC4 Connector
↓
Charge Controller
↓
Battery
However, flexible solar panels require additional installation considerations:
Check Panel Voltage
Flexible solar panels are available in different electrical designs.
Always confirm:
- operating voltage
- open circuit voltage
- controller compatibility
Consider Roof Conditions
RV and marine installations may experience:
- vibration
- temperature changes
- salt exposure
- partial shading
A properly designed electrical connection helps maintain long-term reliability.
Bright Solar flexible solar panels are designed for mobile and off-grid applications where lightweight construction and installation flexibility are important. When integrated with a suitable MPPT charge controller and correctly sized battery system, they can provide reliable renewable power for many outdoor applications.
Common Mistakes When Connecting Solar Panels to Batteries
Mistake 1: Connecting Panels Directly to Battery
Solar panels should normally connect through a suitable charge controller.
Direct connection may cause:
- uncontrolled charging
- battery damage
- reduced battery lifespan
Mistake 2: Ignoring Charge Controller Limits
Always check:
Maximum PV voltage:
Must be higher than the solar array Voc
Maximum charging current:
Must support expected solar output
Mistake 3: Using Incorrect Cable Size
Cable selection depends on:
- current
- cable length
- allowable voltage drop
Higher current systems usually require thicker cables.
Mistake 4: Mixing Different Solar Panels Without Calculation
Combining panels with different:
- voltage ratings
- current ratings
- electrical characteristics
can reduce system performance.
Solar Panel Connection Checklist
Before powering your system, confirm:
✓ Solar panel voltage matches controller range
✓ Controller current rating is sufficient
✓ Battery voltage matches system design
✓ Positive and negative polarity are correct
✓ Connectors are properly locked
✓ Cables are correctly sized
✓ Fuses or breakers are installed where required
Bright Solar System Design Approach
For Bright Solar flexible solar panel applications, the connection method should always be selected based on the complete energy system.
A reliable design considers:
- solar panel output
- battery capacity
- charge controller type
- daily energy consumption
- installation environment
Whether the system uses series, parallel, or series-parallel wiring, correct electrical design is the key factor in achieving stable solar performance.
Solar Panel Connector Types and PV System Components Explained
A solar panel system is not only made of photovoltaic modules. Reliable solar power generation depends on multiple components working together, including connectors, cables, junction boxes, charge controllers, batteries, and inverters.
Understanding solar panel parts and components helps installers choose the correct wiring method, improve system safety, and avoid common connection problems.
Whether you are building an RV solar system, marine solar setup, or off-grid power system, every component affects the final performance of the PV system.
Main Components of a Solar Panel System
A complete solar energy system typically includes:
1. Solar Panels (PV Modules)
Solar panels are the primary energy generation component.
A PV module consists of:
- Solar cells
- Encapsulation materials
- Protective surface layer
- Junction box
- Output cables
The solar cells convert sunlight into DC electricity through the photovoltaic effect.
Modern solar panels commonly use:
- Monocrystalline silicon cells
- Polycrystalline silicon cells
- Flexible thin-film technologies
Bright Solar flexible solar panels use lightweight construction and flexible materials designed for applications where traditional rigid panels are difficult to install, such as RV roofs, marine surfaces, and portable solar systems.
2. Solar Cells
Solar cells are the smallest electricity-generating units inside a solar panel.
Main function:
Convert sunlight into electrical energy.
Multiple solar cells are connected together to create a PV module with a specific:
- Voltage output
- Current output
- Power rating
The number and arrangement of cells affect:
- Panel voltage
- Panel efficiency
- Physical size
3. Solar Panel Junction Box
The junction box is located on the back of a solar panel.
Its functions include:
Electrical Connection
It connects internal solar cell circuits with external PV cables.
Protection
It usually contains:
- Bypass diodes
- Electrical protection components
Bypass diodes help reduce the impact of partial shading by allowing current to bypass affected sections of the panel.
This is especially important in series-connected solar arrays because shading on one panel can influence string performance.
4. Solar Cables
Solar cables transfer DC electricity from panels to the charge controller.
PV cables are designed for outdoor environments and typically provide:
- UV resistance
- Weather resistance
- Temperature resistance
- Long-term durability
Common solar cable specifications include:
- 4mm²
- 6mm²
- 10mm²
The correct cable size depends on:
- Current
- Cable length
- Voltage drop requirements
A higher-current parallel system usually requires thicker cables compared with a higher-voltage series system.
Solar Panel Connector Types Explained
MC4 Solar Connectors
MC4 connectors are the most recognized connector type used in modern PV systems.
MC4 stands for:
Multi-Contact 4mm
They were developed by Stäubli Electrical Connectors and became widely adopted because of their reliable locking design and outdoor durability.
Advantages of MC4 Connectors
Weather Protection
Designed for outdoor solar environments.
Secure Locking
The locking mechanism helps prevent accidental disconnection.
Easy Installation
Allows installers to quickly connect:
- solar panels
- extension cables
- branch connectors
MC4 Connector Structure
A typical MC4 connector includes:
Male Connector
Usually contains:
- metal contact pin
- protective housing
Female Connector
Usually contains:
- metal socket
- locking mechanism
Sealing Components
Provide protection against:
- moisture
- dust
- outdoor exposure
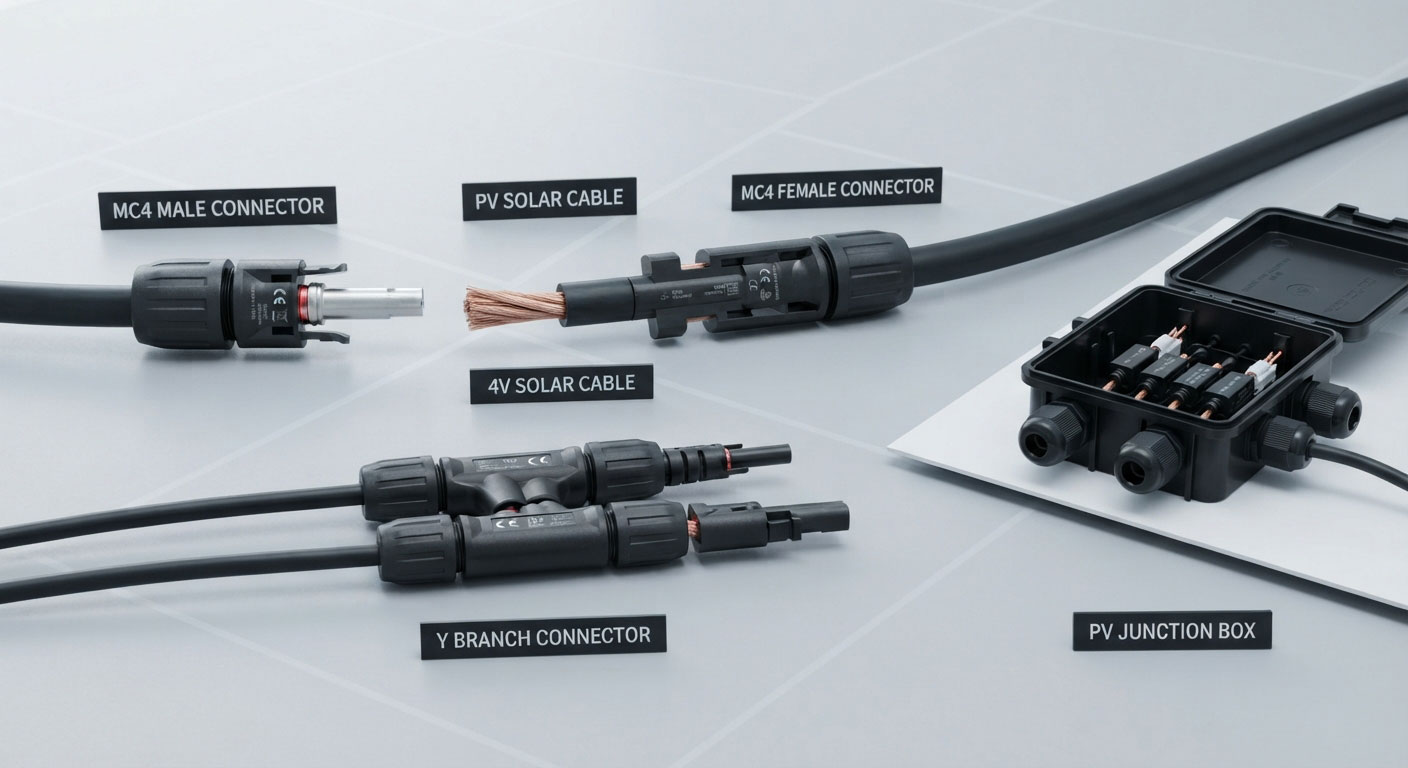
MC4 Y Branch Connectors
MC4 Y connectors are commonly used when connecting solar panels in parallel.
Example:
Two solar panels:
Panel 1 positive
Panel 2 positive
↓
Combined positive output
The same applies to negative connections.
Applications:
- RV solar systems
- portable solar arrays
- small off-grid systems
Solar Combiner Box
A combiner box is used when multiple solar strings need to be combined.
Example:
String 1:
3 solar panels in series
String 2:
3 solar panels in series
↓
Combiner box
↓
Charge controller / inverter
Common functions:
- Combine multiple PV inputs
- Provide overcurrent protection
- Simplify maintenance
Combiner boxes are more common in larger solar installations rather than small portable systems.
Solar Charge Controller
The charge controller manages energy between solar panels and batteries.
Main functions:
- Regulate charging voltage
- Prevent overcharging
- Protect batteries
- Optimize solar energy harvesting
Two major types:
PWM Controller
Advantages:
- Simple design
- Lower cost
- Suitable for small systems
Limitations:
- Less flexible with high-voltage solar arrays
MPPT Controller
Advantages:
- Higher energy harvesting capability
- Supports wider PV voltage range
- Better for larger systems
Common applications:
- RV solar
- off-grid homes
- lithium battery systems
Source:
https://www.victronenergy.com/solar-charge-controllers
Battery System
The battery stores solar energy for later use.
Common battery types:
Lithium Iron Phosphate (LiFePO4)
Advantages:
- Long cycle life
- High usable capacity
- Lightweight
Lead-Acid Batteries
Advantages:
- Lower initial cost
- Widely available
Battery selection affects:
- solar array size
- charge controller settings
- inverter capacity
Battery Management System (BMS)
Lithium batteries usually include a BMS.
The BMS monitors:
- Battery voltage
- Temperature
- Charging status
- Discharging protection
It helps protect lithium batteries from:
- overcharging
- over-discharging
- overheating
Solar Inverter
The inverter converts DC electricity from batteries into AC electricity.
Solar systems may power:
DC loads:
- LED lights
- DC appliances
AC loads:
- household appliances
- electronics
Common inverter types:
- Pure sine wave inverter
- Modified sine wave inverter
For sensitive electronic devices, pure sine wave inverters are usually preferred.
How Solar Components Work Together
A complete off-grid solar system works as:
Energy Generation
Solar panels capture sunlight.
↓
Power Regulation
Charge controller manages solar energy.
↓
Energy Storage
Battery stores electricity.
↓
Energy Conversion
Inverter converts DC power into AC power.
↓
Energy Usage
Appliances consume electricity.
Each component must be correctly matched.
A high-quality solar panel cannot compensate for an incorrectly sized controller, battery, or cable system.
Choosing Components for Series and Parallel Solar Panels
When designing solar panel wiring, consider:
For Series Connections:
Important components:
- Higher voltage-rated cables
- Compatible MPPT controller
- Correct PV voltage calculation
For Parallel Connections:
Important components:
- Higher current-rated cables
- Branch connectors
- Proper fusing
For Series-Parallel Systems:
Important components:
- Combiner box
- String protection
- Balanced panel specifications
Bright Solar Flexible Solar Panel System Integration
Flexible solar panels require careful component matching because mobile applications often have different requirements from fixed rooftop systems.
For RV, marine, and off-grid installations, Bright Solar recommends considering:
- Solar panel electrical specifications
- MPPT controller compatibility
- Battery capacity
- Connector reliability
- Installation environment
A well-designed solar system is not only about selecting powerful panels. The interaction between every component determines long-term reliability and energy performance.
Key Takeaways
Solar panel systems include:
✓ PV modules
✓ Solar cells
✓ Junction boxes
✓ PV cables
✓ MC4 connectors
✓ Charge controllers
✓ Batteries
✓ Inverters
✓ Protection components
Understanding these parts makes it easier to choose between:
- Series solar panels
- Parallel solar panels
- Series-parallel solar configurations
and build a safer, more efficient photovoltaic system.
Solar Panel Wiring for RV and Off-Grid Systems: Best Setup Guide
RV and off-grid solar systems have different requirements compared with traditional rooftop solar installations. Limited installation space, mobile environments, battery storage needs, and changing sunlight conditions all affect how solar panels should be connected.
Choosing between series and parallel solar panels for an RV or off-grid system depends on several factors:
- Battery voltage
- Charge controller type
- Solar panel quantity
- Roof layout
- Shading conditions
- Daily energy consumption
A properly designed solar wiring system can improve charging efficiency, reduce cable losses, and provide more reliable power during outdoor use.
For flexible solar panels used on RVs, boats, and remote applications, the wiring design is especially important because installation conditions are often more challenging than fixed solar installations.
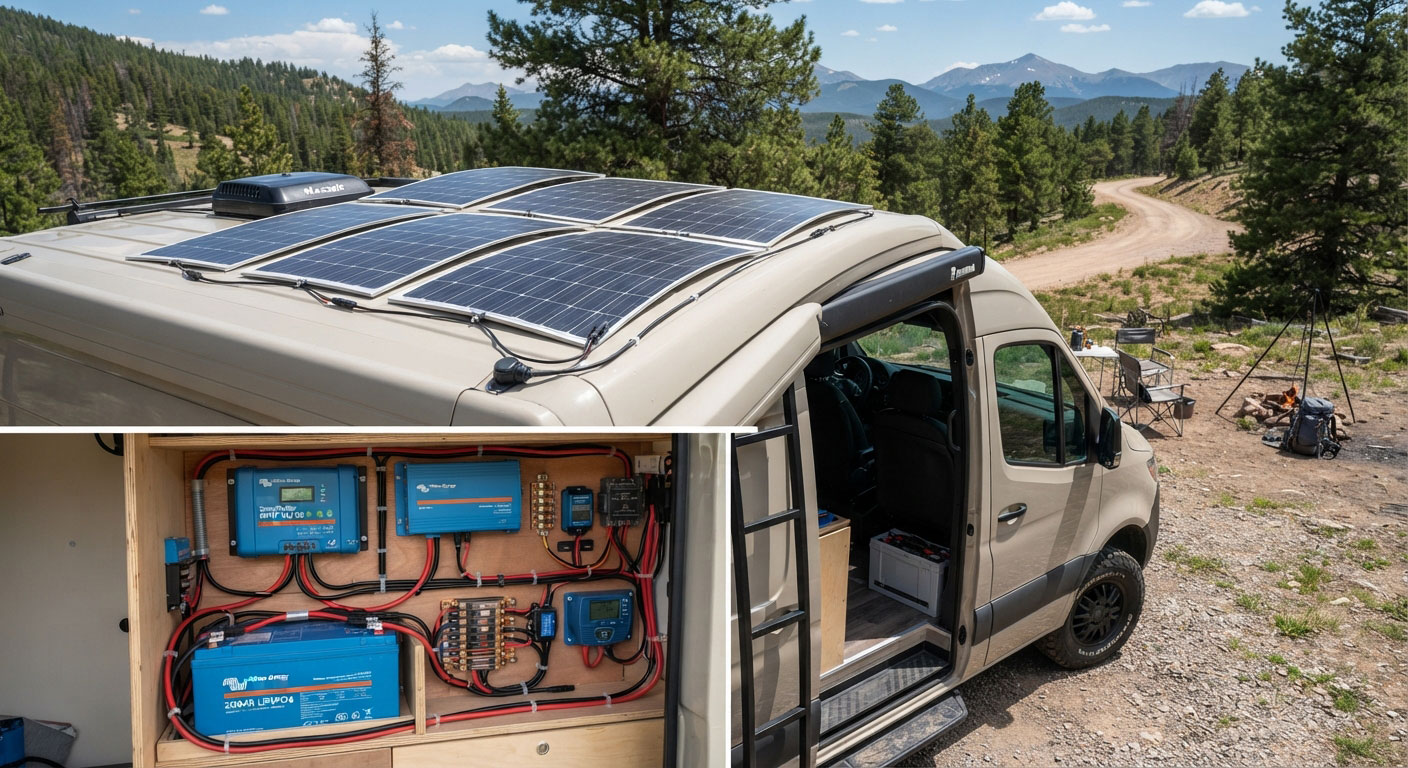
Understanding RV and Off-Grid Solar System Design
A typical RV or off-grid solar system includes:
Solar Panels
↓
Solar Charge Controller
↓
Battery Bank
↓
Inverter
↓
Electrical Loads
Unlike grid-connected solar systems, off-grid systems must store energy because electricity production and consumption usually happen at different times.
For example:
During the day:
Solar panels charge the battery.
At night:
The battery powers:
- Lights
- Refrigerators
- Electronics
- Pumps
- Communication equipment
Therefore, solar panel wiring must work together with the battery system.
Solar Panel Wiring for 12V RV Systems
A 12V battery system is common in:
- Small RVs
- Camper vans
- Boats
- Portable solar applications
Example:
Two 100W solar panels:
Each panel:
- 20V
- 5A
Parallel Connection
Output:
Voltage:
20V
Current:
10A
Power:
200W
Advantages:
✓ Suitable for many 12V systems
✓ Simple wiring
✓ Easy troubleshooting
Considerations:
The charge controller must handle the increased current.
Series Connection
Output:
Voltage:
40V
Current:
5A
Power:
200W
Advantages:
✓ Lower current
✓ Reduced cable losses
✓ Better for MPPT controllers
Considerations:
The controller must support higher PV voltage.
Solar Panel Wiring for 24V and 48V Off-Grid Systems
Larger off-grid systems often use higher battery voltages.
Common configurations:
24V Battery Systems
Often used for:
- Medium RVs
- Small cabins
- Remote power systems
Series solar panel connections can provide suitable PV voltage for MPPT charging.
48V Battery Systems
Common in:
- Larger off-grid homes
- High-power energy storage systems
Higher battery voltage reduces current requirements and can improve overall system efficiency.
According to the U.S. Department of Energy, higher-voltage electrical systems can reduce current requirements for the same power level, which helps reduce electrical losses in conductors.
Source:
https://www.energy.gov/energysaver/solar-photovoltaic-system-design-basics
Best Solar Panel Setup for RV Systems
RV solar design is different from residential solar because available space is limited.
Common RV challenges include:
Limited Roof Area
RV roofs may need to accommodate:
- Air conditioners
- Roof vents
- Satellite antennas
- Storage equipment
This affects panel placement and shading.
Moving Shadows
An RV may park in different environments:
Examples:
- Forest camping
- Mountain areas
- Parking areas
The same solar array may receive different sunlight conditions every day.
Weight Restrictions
RV owners often choose flexible solar panels because they can reduce:
- installation complexity
- additional mounting hardware
- roof loading
Bright Solar flexible solar panels are designed for applications where lightweight construction and installation flexibility are important, including RV and marine environments.
Series vs Parallel RV Solar Panels: Which Setup Is Better?
There is no single best answer.
The ideal configuration depends on the system design.
When Series Wiring Is Better for RV Solar
Series wiring is often preferred when:
Using an MPPT Controller
MPPT controllers can utilize higher PV voltage input.
Example:
Two 200W panels:
Series:
40V / 10A
Advantages:
- lower current
- smaller cable size
- efficient power transmission
Long Cable Distance
If panels are installed far from the battery compartment, higher voltage can help reduce voltage drop.
Similar Panel Conditions
Series works well when panels receive similar:
- sunlight
- orientation
- temperature conditions
When Parallel Wiring Is Better for RV Solar
Parallel wiring can be useful when:
Partial Shading Is Common
Example:
One panel is shaded by:
- roof vent
- tree branch
- equipment
Other panels can continue producing power.
Using a Simple 12V System
Parallel wiring is often easier for smaller systems.
Easy Future Expansion
Adding another panel is usually straightforward if the controller has enough capacity.
Series-Parallel RV Solar Setup Example
For larger RV systems, a series-parallel configuration often provides a practical balance.
Example:
Four 200W flexible solar panels:
Configuration:
2 panels in series
2 panels in series
Then:
Two strings connected in parallel
Final output:
Voltage:
Higher than a single panel
Current:
Higher than one series string
Total power:
800W
Benefits:
✓ Better MPPT performance
✓ Balanced voltage and current
✓ Suitable for larger battery banks
Flexible Solar Panels for RV and Marine Applications
Flexible solar panels are increasingly used in mobile applications because they can adapt to surfaces where rigid panels are difficult to install.
Common applications:
RV Roofs
Advantages:
- Lightweight
- Low-profile installation
- Space-efficient
Boats and Marine Systems
Marine solar installations require consideration of:
- moisture
- salt exposure
- vibration
- limited mounting areas
Off-Grid Equipment
Examples:
- Remote monitoring systems
- Portable power stations
- Field equipment
How Bright Solar Flexible Solar Panels Fit RV and Off-Grid Systems
Bright Solar flexible solar panels are designed for users who need solar power in locations where traditional panels may not be practical.
Typical applications include:
RV Solar Systems
Used for:
- battery charging
- travel power
- camping energy needs
Marine Solar Systems
Used for:
- onboard electronics
- auxiliary power
Off-Grid Systems
Used for:
- remote locations
- backup energy
When integrating flexible solar panels into a complete system, the wiring method should be selected according to:
- panel voltage
- battery voltage
- charge controller specifications
- expected energy demand
Common RV Solar Wiring Mistakes
Mistake 1: Choosing Panels Only by Wattage
A 400W system can have different voltage and current designs.
Always check:
- Voc
- Vmp
- Imp
- controller limits
Mistake 2: Ignoring Shading Conditions
A wiring method that works well on a clear rooftop may not perform the same on an RV.
Mistake 3: Undersizing the Charge Controller
The controller must support:
- PV input voltage
- PV current
- battery charging requirements
Mistake 4: Poor Cable Management
Mobile systems experience:
- vibration
- movement
- temperature changes
Secure cable routing and waterproof connections are essential.
RV and Off-Grid Solar Wiring Checklist
Before installation:
✓ Calculate daily energy consumption
✓ Select battery capacity
✓ Choose MPPT or PWM controller
✓ Calculate PV voltage and current
✓ Select correct cable size
✓ Use compatible connectors
✓ Check shading conditions
✓ Test system output after installation
Final Recommendation for RV and Off-Grid Solar Wiring
For small 12V systems:
Parallel wiring can provide simplicity.
For larger systems using MPPT:
Series or series-parallel wiring often provides better efficiency.
For complex RV and off-grid applications:
Series-parallel configurations offer flexibility by balancing voltage, current, and system scalability.
Bright Solar flexible solar panels provide adaptable solar solutions for RV, marine, and off-grid applications. With the correct wiring strategy, these lightweight PV modules can be integrated into reliable renewable energy systems designed for real-world outdoor conditions.
Common Solar Panel Wiring Mistakes and Troubleshooting Guide
Even when solar panels are high quality, incorrect wiring can reduce system performance, create safety risks, and shorten the lifespan of electrical components.
Many solar problems are not caused by the panels themselves. They often come from issues such as:
- Incorrect series or parallel connections
- Wrong voltage calculations
- Poor connector installation
- Undersized cables
- Charge controller configuration errors
Understanding common mistakes helps solar installers, RV owners, and off-grid users diagnose problems faster and build more reliable photovoltaic systems.
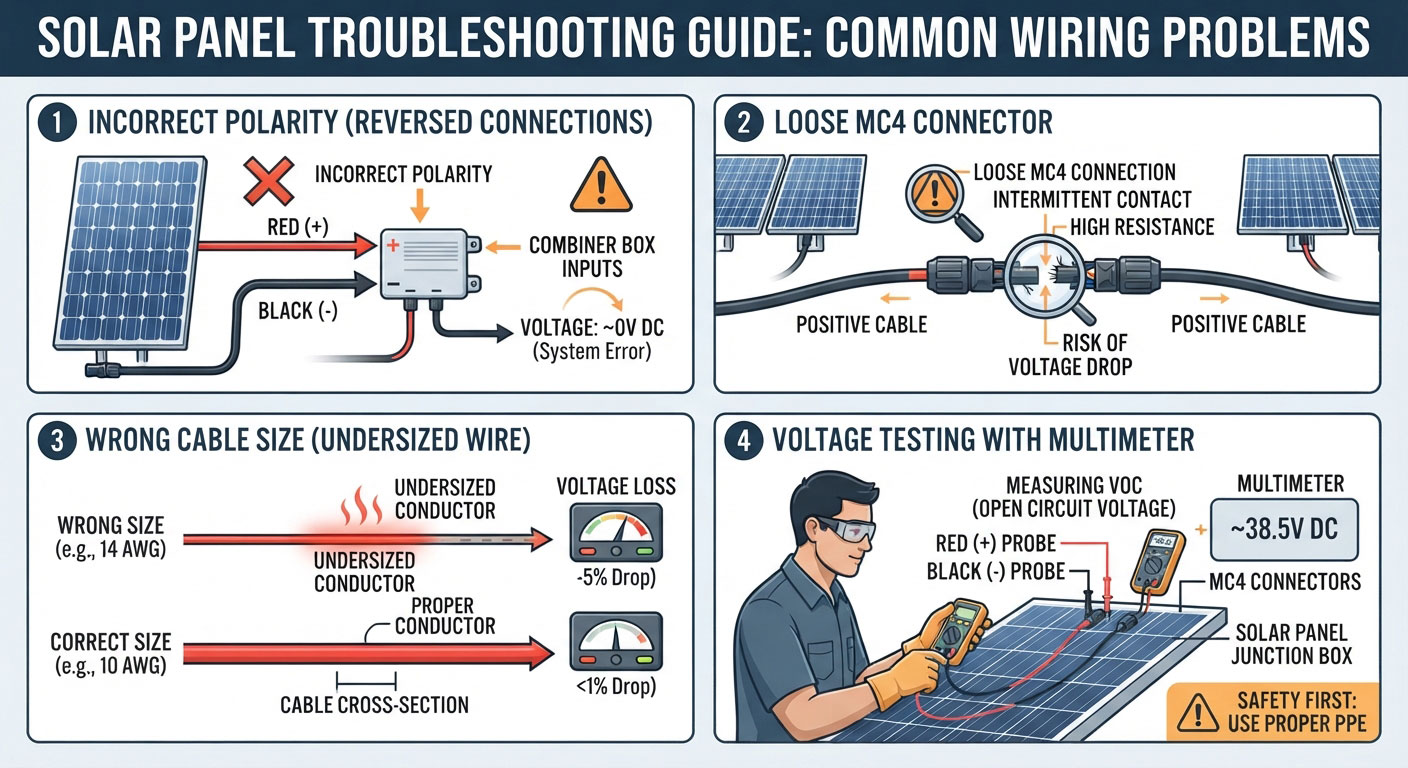
Mistake 1: Connecting Solar Panels Without Checking Voltage Limits
One of the most common errors is connecting multiple solar panels in series without calculating the final PV voltage.
In a series connection:
Voltage increases
Example:
One panel:
- Voc: 22V
Three panels in series:
22V × 3 = 66V
Before installation, check whether the charge controller can safely handle this voltage.
Important specifications:
- Maximum PV input voltage
- MPPT operating voltage range
- Temperature-adjusted Voc
Cold weather can increase solar panel open-circuit voltage, so installers normally design systems using the highest expected voltage rather than the average value.
The National Renewable Energy Laboratory (NREL) provides photovoltaic system modeling resources that consider temperature effects on PV electrical performance.
Source:
https://www.nrel.gov/pv/
Mistake 2: Mixing Incompatible Solar Panels
Connecting different solar panels together without calculation can reduce system performance.
Common differences include:
- Different wattage
- Different voltage
- Different current
- Different cell technology
For example:
Panel A:
200W
20V
10A
Panel B:
200W
30V
6.7A
Although both panels have the same power rating, their electrical characteristics are different.
When connected together, the lower-performing panel can affect the overall array output.
For best results, solar panels connected in the same string should have similar:
- Voltage characteristics
- Current ratings
- Electrical specifications
Mistake 3: Connecting Solar Panels Directly to Batteries
A frequent beginner mistake is:
Solar panel
↓
Battery
without a charge controller.
This is not recommended for standard solar systems.
The correct connection is:
Solar panel
↓
Charge controller
↓
Battery
The charge controller regulates charging voltage and protects the battery from improper charging conditions.
Victron Energy explains that solar chargers are required to manage energy flow between PV panels and batteries in properly designed DC systems.
Source:
https://www.victronenergy.com/media/pg/The_Wiring_Unlimited_book/en/dc-wiring.html
Mistake 4: Choosing the Wrong Charge Controller
A solar charge controller must match the solar array and battery system.
Common mistakes:
PV Voltage Too High
Example:
Solar array:
100V
Controller maximum input:
75V
Result:
The controller may be damaged or unable to operate safely.
PV Current Too High
Example:
Solar array:
40A output
Controller rating:
20A
Result:
The controller may limit output or operate outside recommended conditions.
MPPT vs PWM Controller Selection Mistake
Many small systems use PWM controllers because they are simple and affordable.
However, larger systems often benefit from MPPT controllers because they can operate with higher PV voltage.
A common mistake is selecting a controller only based on price rather than system requirements.
Consider:
- Battery voltage
- Solar panel voltage
- Daily energy needs
- Future expansion
Mistake 5: Using Incorrect Cable Size
Cable selection directly affects solar system efficiency.
A cable that is too small may cause:
- Voltage drop
- Heat generation
- Reduced charging performance
The amount of voltage drop depends on:
- Current
- Cable length
- Cable resistance
Because parallel solar panels increase current, they usually require thicker cables compared with equivalent series configurations.
Example:
400W solar array:
Parallel:
20V / 20A
Series:
80V / 5A
The parallel system requires cables designed for higher current.
Mistake 6: Poor MC4 Connector Installation
MC4 connectors are reliable when installed correctly.
Common connector problems include:
Loose Connection
Causes:
- intermittent power
- overheating
- energy loss
Incorrect Crimping
A poor crimp can create resistance and heat.
Mixing Incompatible Connector Brands
Although many connectors look similar, not all PV connectors are officially compatible.
For reliable PV connections, installers should use properly matched connectors.
Stäubli, the original MC4 manufacturer, provides guidance on certified PV connector systems.
Mistake 7: Ignoring Partial Shading
Solar panels rarely operate under perfect laboratory conditions.
Real installations may experience:
- trees
- buildings
- roof equipment
- clouds
- dirt accumulation
Series-connected solar panels are more sensitive to uneven sunlight because current flows through the entire string.
Parallel systems can provide better independence between panels, but they still experience reduced production when sunlight is blocked.
Good installation practices include:
- avoiding unnecessary shading
- optimizing panel placement
- considering bypass diode protection
Troubleshooting Low Solar Panel Output
If a solar system produces less power than expected, check the following.
Step 1: Check Solar Conditions
Confirm:
- strong sunlight
- no shading
- clean panel surface
Solar output naturally changes depending on:
- time of day
- weather
- panel temperature
Step 2: Check Panel Voltage
Use a multimeter to measure:
Open Circuit Voltage (Voc)
Disconnect the panel from the controller and measure voltage output.
Compare the result with the panel specification.
A significantly low reading may indicate:
- damaged panel
- wiring issue
- connector problem
Step 3: Check Connections
Inspect:
- MC4 connectors
- cable joints
- polarity
- corrosion
Loose connections are one of the most common causes of reduced solar output.
Step 4: Check Charge Controller Status
Review:
- charging voltage
- error messages
- battery status
- PV input data
Many modern MPPT controllers provide monitoring through:
- displays
- Bluetooth apps
- system monitoring platforms
Step 5: Check Battery Condition
A solar system may appear to have a panel problem when the actual issue is the battery.
Check:
- battery voltage
- battery health
- BMS protection status
Lithium batteries may temporarily disconnect charging due to:
- overvoltage protection
- low temperature protection
- BMS settings
Testing Solar Panel Wiring With a Multimeter
Basic testing steps:
Test 1: Check Polarity
Confirm:
Positive (+)
Negative (-)
Incorrect polarity can prevent charging.
Test 2: Measure PV Voltage
Compare measured voltage with expected:
- series voltage
- parallel voltage
Example:
Two 20V panels:
Series:
≈40V
Parallel:
≈20V
Test 3: Check Current Output
Current testing requires proper equipment and safety precautions.
Compare measured current with:
- Isc rating
- expected sunlight conditions
Bright Solar Recommendations for Reliable Solar Wiring
For Bright Solar flexible solar panel installations, reliable performance depends on correct system matching.
Before installation, consider:
Solar Panel Selection
Choose panels based on:
- power requirements
- available space
- voltage requirements
Wiring Design
Select:
- series
- parallel
- series-parallel
according to the complete system.
Component Matching
Ensure compatibility between:
- solar panels
- MPPT controller
- battery
- inverter
- connectors
A well-designed solar system should not only produce energy when conditions are ideal. It should continue working reliably through changing weather, movement, and long-term outdoor exposure.
Solar Panel Wiring Troubleshooting Checklist
✓ Confirm correct series or parallel connection
✓ Check PV voltage limits
✓ Verify battery voltage
✓ Inspect MC4 connectors
✓ Confirm cable size
✓ Test panel voltage
✓ Check charge controller settings
✓ Inspect shading conditions
✓ Verify battery health
FAQ About Series and Parallel Solar Panels
Understanding how series and parallel solar panels work can help you design a safer and more efficient photovoltaic system. Below are the most common questions asked by homeowners, RV owners, and off-grid solar users when connecting multiple solar panels together.
Are Solar Panels Better in Series or Parallel?
Neither series nor parallel wiring is always better. The best choice depends on your solar system design, including battery voltage, charge controller type, shading conditions, and cable distance.
Series connections increase voltage while keeping current the same, making them suitable for many MPPT-based systems and longer cable runs.
Parallel connections increase current while keeping voltage the same, making them useful for lower-voltage systems or installations where panels may experience different shading conditions.
For most modern off-grid and RV applications, the choice is usually based on matching the solar array with the charge controller and battery system rather than simply choosing one wiring method.
How Many Solar Panels Can Be Connected in Series?
The number of solar panels that can be connected in series depends on the maximum PV input voltage of the charge controller or inverter.
The basic calculation is:
Maximum Series Panels = Maximum PV Input Voltage ÷ Panel Open Circuit Voltage (Voc)
Example:
Charge controller maximum PV input:
100V
Solar panel Voc:
22V
Calculation:
100V ÷ 22V = 4.5
In this example, four panels could normally be connected in series, but the final design should also consider temperature effects because solar panel voltage increases in colder conditions.
Always check:
- Panel Voc
- Temperature coefficient
- Controller maximum voltage rating
Can Solar Panels With Different Wattages Be Connected Together?
Yes, but it requires careful design.
Different wattage panels may have different:
- Voltage ratings
- Current ratings
- Electrical characteristics
For series connections:
The current is usually limited by the panel with the lowest current rating.
For parallel connections:
The voltage should be closely matched because the lower-voltage panel can affect overall system operation.
For the best performance, solar panels connected in the same string should have similar electrical specifications.
Can Solar Panels Be Connected Directly to a Battery?
For most solar systems, no.
Solar panels should connect through a charge controller:
Solar Panel
↓
Charge Controller
↓
Battery
The charge controller regulates charging voltage and protects the battery from overcharging or improper charging conditions.
Direct connection may cause:
- unstable charging
- reduced battery lifespan
- possible battery damage
Source:
Victron Energy Wiring Unlimited Guide
https://www.victronenergy.com/media/pg/The_Wiring_Unlimited_book/en/dc-wiring.html
Is Series Solar Panel Wiring More Efficient Than Parallel?
Series wiring is not automatically more efficient in every situation.
However, series connections can reduce electrical losses because they increase voltage and reduce current for the same power output.
Since cable losses increase with current:
Power Loss = Current² × Resistance
Lower current can reduce energy loss in cables.
Series wiring is often beneficial for:
- longer cable distances
- MPPT charge controllers
- larger solar systems
Parallel wiring may be better when:
- shading is common
- simple expansion is needed
- lower voltage systems are used
Do Solar Panels in Parallel Charge Faster?
Parallel solar panels can provide more charging current, which may increase charging speed if the battery and charge controller can accept the additional current.
Example:
Two 200W panels:
Parallel:
20V × 20A
The higher current can provide faster charging compared with a single panel.
However, charging speed also depends on:
- battery capacity
- battery state of charge
- charge controller rating
- sunlight conditions
Adding more panels does not always mean faster charging if another system component becomes the limitation.
Should RV Solar Panels Be Connected in Series or Parallel?
Both options can work for RV solar systems.
The best choice depends on the RV electrical design.
Series RV Solar Panels
Recommended when:
- using MPPT controller
- cable distance is longer
- panels receive similar sunlight
Benefits:
- higher voltage
- lower current
- reduced cable losses
Parallel RV Solar Panels
Recommended when:
- using smaller 12V systems
- partial shading is common
- simple expansion is needed
Benefits:
- independent panel operation
- easier troubleshooting
Series-Parallel RV Solar Panels
Recommended for:
- larger RV solar systems
- multiple flexible solar panels
- higher energy requirements
This configuration provides a balance between voltage and current.
Bright Solar flexible solar panels are commonly used in RV and off-grid applications where space, weight, and installation flexibility are important factors.
Does Shading Affect Series and Parallel Solar Panels Differently?
Yes.
In series connections:
All panels share the same current path.
If one panel is shaded, the performance of the series string may decrease.
In parallel connections:
Each panel has its own current path.
Other panels can continue generating electricity when one panel receives less sunlight.
However, shading losses depend on:
- panel design
- bypass diodes
- shading intensity
- system configuration
The best solution is usually preventing shading through proper panel placement.
Can I Add More Solar Panels to an Existing System?
Yes, but only if the existing components can handle the additional power.
Before expansion, check:
Charge Controller Capacity
Confirm:
- maximum PV voltage
- maximum charging current
Battery Capacity
A larger solar array requires sufficient storage capacity.
Wiring Capability
Check:
- cable size
- connectors
- fuses
Adding panels without upgrading other components can create system limitations.
What Connector Types Are Used for Solar Panels?
The most common solar connector type is MC4.
Common PV connection components include:
- MC4 connectors
- MC4 extension cables
- MC4 Y branch connectors
- PV combiner boxes
MC4 connectors are widely used because they provide secure, weather-resistant connections for outdoor photovoltaic installations.
Source:
Stäubli MC4 Connector Information
https://www.staubli.com/us/en/electrical-connectors/industries/renewable-energy/the-original-mc4.html
What Is the Best Solar Panel Wiring for Off-Grid Systems?
There is no single best configuration.
A typical approach:
Small Off-Grid System
Often:
- parallel panels
- 12V battery
- PWM or small MPPT controller
Medium Off-Grid System
Often:
- series or series-parallel panels
- MPPT controller
- 24V battery
Large Off-Grid System
Often:
- higher voltage PV arrays
- series-parallel configuration
- MPPT controller
- 48V battery system
The correct design depends on the entire energy system.
Final Thoughts: Choosing the Right Solar Panel Connection Method
Understanding series and parallel solar panels is the foundation of reliable PV system design.
Series connections increase voltage and are often preferred for higher-efficiency solar designs with MPPT controllers.
Parallel connections increase current and provide flexibility for smaller systems or installations with shading concerns.
Series-parallel configurations combine both advantages and are widely used for larger solar systems.
Before connecting solar panels, always evaluate:
- Solar panel specifications
- Battery voltage
- Charge controller limits
- Cable size
- Installation environment
Bright Solar provides flexible solar panel solutions for RV, marine, and off-grid applications where efficient system design is essential. By selecting the correct wiring configuration, users can maximize solar performance and build more reliable renewable energy systems.
Conclusion: Choosing the Right Solar Panel Connection Method
Understanding series and parallel solar panels is the foundation of designing an efficient and reliable photovoltaic system.
The best wiring method depends on the relationship between solar panels, charge controllers, batteries, and the installation environment.
Series connections increase voltage while keeping current unchanged, making them suitable for many MPPT-based systems, longer cable distances, and higher-voltage solar designs.
Parallel connections increase current while maintaining the same voltage, making them useful for smaller systems, 12V applications, and installations where partial shading may occur.
Series-parallel configurations combine both methods and provide greater flexibility for larger RV, marine, and off-grid solar systems.
Before connecting multiple solar panels, always evaluate:
- Solar panel voltage and current specifications
- Battery voltage requirements
- Charge controller limitations
- Cable size and voltage drop
- Shading conditions
- Future system expansion plans
A successful solar installation is not only about choosing higher-wattage panels. The wiring design determines how efficiently energy moves from the PV modules to the battery and loads.
For applications such as RVs, boats, and remote power systems, Bright Solar flexible solar panels provide lightweight and adaptable solar solutions. When paired with the correct wiring configuration and system components, flexible solar panels can deliver dependable renewable energy in challenging installation environments.
Related recommendations
-

Motorhome Solar Kit: Reliable Off-Grid Power for Modern RV Travel
138Compare series vs parallel solar panels for RVs, homes, and off-grid systems. Bright Solar explains voltage, current, shading, and wiring efficiency.
View details -
eco worthy flexible solar panels: Features, Uses and Buying Guide
261ECO-WORTHY flexible solar panels suit selected RV, marine, and off-grid installations where low weight, profile, or curved surfaces matter. Exact model speci...
View details -
Fold Up Solar Panel: Portable Power for RVs, Camping and Off-Grid Use
93Fold up solar panels provide portable solar power that can be repositioned for better sunlight and stored when not in use.
View details -
120 Watt Flexible Solar Panel: Lightweight Solar Solution for Mobile Power
138Discover the 120 watt flexible solar panel from Bright Solar. Learn how lightweight solar technology delivers reliable energy for RVs, boats, camping, and off-grid applications.
View details