How to Hook Up Solar Panel to Battery?
Direct Answer :
To hook up a solar panel to a battery, connect the solar panel to a compatible charge controller first, then connect the controller to the battery terminals with correct polarity. This setup regulates charging voltage, prevents battery damage, and creates a safer solar power system for RVs, boats, and off-grid applications.
Installing a solar panel battery connection correctly is not only about joining positive and negative wires. In real field installations, the order of connection, controller selection, wire sizing, and battery chemistry all affect system reliability.
At Bright Solar, our technical team has worked with flexible solar panels for RVs, marine applications, and portable power systems where installation space is limited and wiring mistakes can directly reduce energy output. A properly connected system helps protect batteries while allowing solar energy to be stored efficiently.
What You Need Before Connecting a Solar Panel to a Battery
Before learning how to hook up solar panel to battery, prepare the correct components. A basic solar charging system usually includes:
| Component | Purpose |
|---|---|
| Solar panel | Converts sunlight into DC electricity |
| Solar charge controller | Controls charging voltage and current |
| Battery | Stores solar energy |
| Solar cables | Transfers electrical power |
| Fuse or circuit breaker | Provides electrical protection |
| Connectors | Creates secure connections |
For most off-grid systems, the charge controller is the key component between the panel and battery. Directly connecting a solar panel to a battery without regulation can cause overcharging, especially with lithium batteries that require specific charging parameters.
According to the U.S. Department of Energy, solar photovoltaic systems produce variable electricity depending on sunlight intensity, temperature, and system conditions. This is why battery charging requires proper electrical management.
Source: U.S. Department of Energy Solar Photovoltaic Technology Basics
How to Connect Solar Panel to Battery Step by Step
Step 1 — Check Solar Panel and Battery Specifications
Before wiring, confirm:
- Solar panel voltage matches the charge controller input range
- Battery voltage matches the controller charging profile
- Controller current rating is suitable for panel output
For example:
- A 100W solar panel with a 12V battery system can produce around 5–6 amps under ideal conditions.
- A 400W solar panel system may require a higher current-rated controller depending on voltage configuration.
Actual output varies because sunlight, temperature, shading, and installation angle influence production.
Step 2 — Connect Battery to Charge Controller First
The recommended connection order is:
- Connect battery positive (+) cable to controller battery positive terminal.
- Connect battery negative (-) cable to controller battery negative terminal.
- Allow the controller to recognize battery voltage.
Many solar installers connect the battery first because the controller uses battery voltage detection to configure the charging process.
A common mistake seen in RV installations is connecting the solar panel first. This can confuse some controllers during initial setup.
Step 3 — Connect Solar Panel to Charge Controller
After the battery connection:
- Turn off solar input if your controller has a disconnect switch.
- Connect solar panel positive (+) cable to PV positive terminal.
- Connect solar panel negative (-) cable to PV negative terminal.
- Check controller display for charging status.
Always confirm polarity before connecting cables. Reverse polarity can damage electrical components.
Series or Parallel Solar Panel Connections for Battery Charging
When connecting multiple solar panels, the wiring method affects system voltage and current.
| Connection Type | Voltage | Current | Common Use |
|---|---|---|---|
| Series connection | Increases | Same | Longer cable runs, MPPT controllers |
| Parallel connection | Same | Increases | RV and low-voltage systems |
| Series-parallel | Increases | Increases | Larger off-grid systems |
For example, two 100W panels connected in series can increase voltage while maintaining the same current. Two panels connected in parallel maintain voltage while doubling available current.
The correct choice depends on:
- Charge controller type
- Battery voltage
- Cable distance
- Solar panel specifications
According to National Renewable Energy Laboratory, photovoltaic system performance depends on multiple environmental factors, including solar irradiance and temperature conditions.
Source: National Renewable Energy Laboratory PVWatts Calculator
Choosing the Right Charge Controller for Solar Battery Systems
There are two common controller types:
PWM Charge Controller
Advantages:
- Lower cost
- Simple installation
- Suitable for small solar systems
Limitations:
- Less efficient when panel voltage differs significantly from battery voltage
MPPT Charge Controller
Advantages:
- Better energy harvesting
- Handles higher voltage solar arrays
- Suitable for larger RV and off-grid systems
For flexible solar panels used in mobile applications, MPPT controllers are often selected because roof space is limited and maximizing every watt matters.
Bright Solar flexible solar panels are commonly designed for applications where weight, installation area, and energy efficiency need to be balanced.
Common Mistakes When Hooking Up Solar Panels to Batteries
A solar battery system can appear simple after installation, but small wiring mistakes often create long-term problems. During field inspections of RV and off-grid solar setups, several connection issues appear repeatedly.
Connecting Solar Panel Directly to Battery Without a Controller
A solar panel should normally not be connected directly to a battery because panel output changes throughout the day.
A 100W panel may produce different voltage and current levels depending on:
- Sun intensity
- Panel temperature
- Shading conditions
- Installation angle
A charge controller stabilizes the charging process and protects the battery from excessive voltage.
Using Incorrect Cable Size
Cable selection affects voltage drop and system efficiency.
For example:
- Small solar systems may use shorter 10 AWG cables.
- Larger systems with higher current require thicker cables.
- Longer cable distances require additional planning.
A cable that is too thin can create heat, reduce charging performance, and increase energy loss.
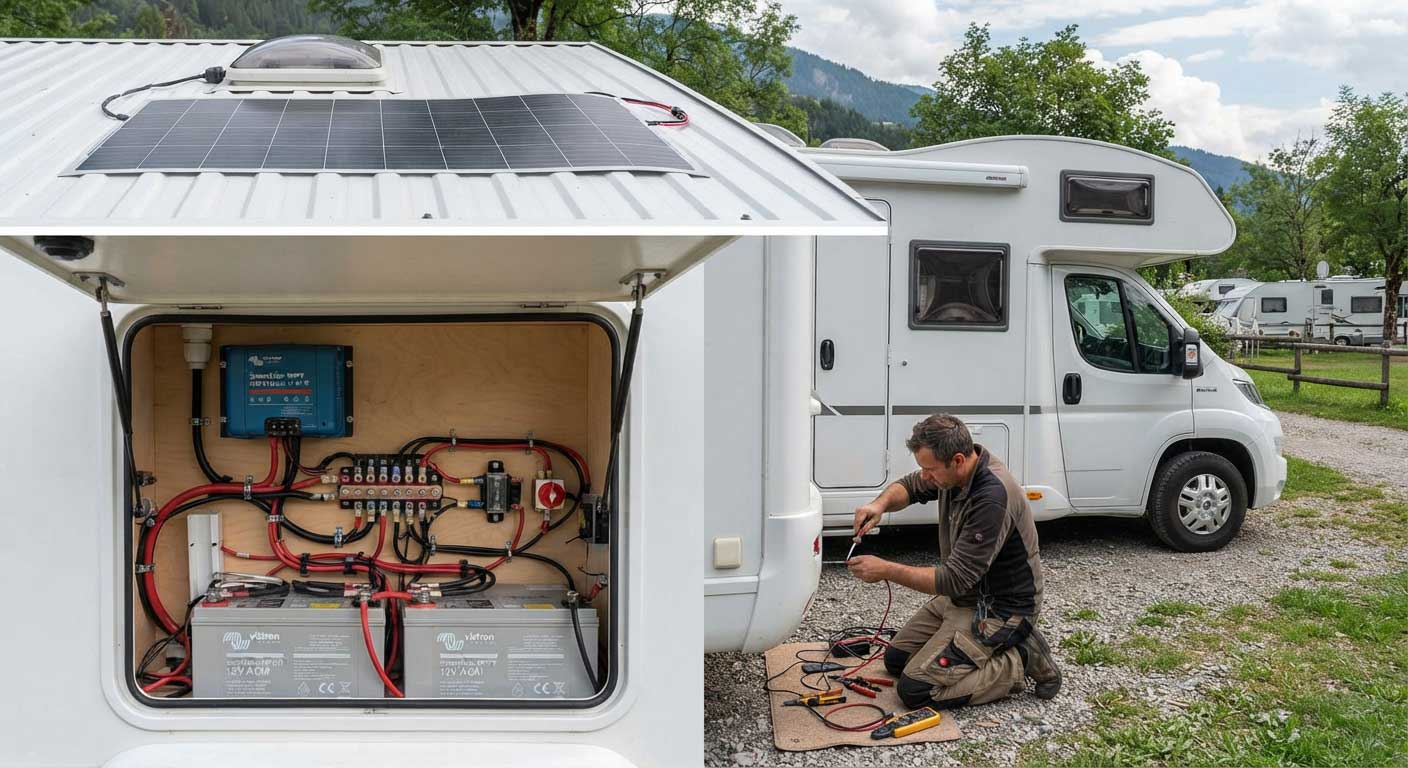
In practical RV installations, cable routing is often more challenging than the electrical connection itself. Roof penetrations, battery location, and limited storage compartments determine the final wiring design.Learn more about the Flexible Solar Panel Installation Guide
Reversing Positive and Negative Connections
Always check polarity before connecting:
| Cable Mark | Connection |
|---|---|
| Red cable | Positive (+) |
| Black cable | Negative (-) |
Before final connection:
- Use a multimeter to confirm voltage.
- Check polarity markings.
- Tighten all terminals securely.
- Protect exposed connections from moisture.
Marine and outdoor systems require additional attention because salt air and humidity can accelerate corrosion.
Solar Panel Battery Connection Example for an RV System
A typical RV solar setup may include:
- 200W–400W flexible solar panels
- MPPT charge controller
- 12V lithium battery bank
- DC loads such as lights, refrigerators, and charging devices
A basic connection layout:
Solar Panel → Charge Controller → Battery → DC Loads
For example, a 400W flexible solar panel system connected to a 12V battery can provide meaningful energy for mobile applications, but actual daily production depends on location and sunlight availability.
The National Renewable Energy Laboratory highlights that solar production varies according to solar resource, weather, system orientation, and operating conditions.
Source: National Renewable Energy Laboratory PV Performance Modeling Collaborative

FAQ About Hooking Up Solar Panels to Batteries
Can I connect a solar panel directly to a battery?
Usually no. A solar panel should connect through a charge controller to regulate voltage and charging current. Direct connection may cause improper charging and shorten battery life.
What connects first, solar panel or battery?
The battery should usually be connected to the charge controller first. This allows many controllers to detect battery voltage before receiving solar input.
Do I need a fuse between solar panel and battery?
A fuse or circuit protection device is recommended because it helps protect wiring and components from abnormal current conditions.
Can I connect multiple solar panels to one battery?
Yes, multiple panels can charge one battery when the charge controller is correctly sized. The total solar power must stay within controller voltage and current limits.
Is MPPT better than PWM for solar battery charging?
For many larger or space-limited systems, MPPT controllers provide better energy harvesting because they can operate solar panels at their optimal power point.
Can flexible solar panels charge lithium batteries?
Yes. Flexible solar panels can charge lithium batteries when paired with a compatible charge controller configured for the correct battery charging profile.
Final Checklist Before Connecting Your Solar Panel Battery System
Before powering your system, check:
✓ Solar panel specifications match controller input limits
✓ Battery voltage matches charging settings
✓ Positive and negative cables are correct
✓ Cable size matches current requirements
✓ Connections are tight and protected
✓ Controller shows normal charging status
A reliable solar installation depends on more than simply connecting wires. Understanding how to hook up solar panel to battery helps create safer and more efficient solar systems for RVs, boats, cabins, and other off-grid applications.
Bright Solar focuses on flexible solar panel solutions designed for applications where installation space, weight, and durability matter. Correct system design combined with proper wiring helps users get consistent energy performance in real-world conditions.
The prev: how solar panels make electricity?The next: How to Connect Solar Panels in Parallel?
Related recommendations
-

Will Solar Panels Work on a Cloudy Day?
186Yes, solar panels work on cloudy days because photovoltaic cells can use diffuse daylight, although thicker clouds usually reduce electricity production.
View details -
How Are Solar Panels Produced?
155Discover how are solar panels produced, from silicon cells to final assembly. Learn the manufacturing process, materials, technology, and quality checks.
View details -
how to make a portable solar panel stand?
276Build a portable solar panel stand from lightweight aluminum or weather-resistant wood, with adjustable tilt, stable feet, and a foldable design.
View details -
How to attach flexible solar panel to RV roof?
362Learn how to attach flexible solar panel to RV roof safely and securely. Discover real installation methods, adhesive tips, wiring advice, and RV solar insights.
View details